

Installation Instructions: Basement – Floors and Foundation Walls
Introduction
These installation instructions describe how to use the Pordrän system for various types of foundation walls—with or without a projecting footing, deep foundations, on bedrock, or on uneven stone foundations. Before installation, start by reviewing the Important Foundation Requirements for the Pordrän system to ensure proper function. Next, select your foundation method and follow the instructions for correctly installing Pordrän panels and drainage pipes. Then proceed to Step 2—installation of geotextile fabric and safety fabric—and then Step 3—installation of the cover strip.Finally, Step 4—backfilling.
It’s not just exterior walls that can benefit from Pordrän; it can also be effectively installed “indoors” beneath the floor surface— read more about it here.
If you have any questions or need further assistance, please feel free to contact us.
For those of you who are already familiar with installing the Pordrän, we offer our quantity calculation tool for basement walls and foundation walls, which automatically helps you calculate the materials needed for your project:
Key prerequisites for the proper functioning of the Pordrän system
The following instructions must be followed and implemented before, during, and after the installation of Pordrän to ensure proper and correct operation.
- Do not excavate within the load distribution angle—marked with (!) in the images. Excavation should be carried out at an angle of approximately 45 degrees from the bottom of the foundation footing.
- During renovation, the old wall must be cleaned of any dense layers. The lower section, up to 50 cm above the basement floor on the interior side, is subject to the highest moisture load and should be cleaned as thoroughly as possible. The wall above this section should be cleaned over at least 50% of the wall surface, evenly distributed.
- All joints, both vertical and horizontal, must be sealed. This also applies to cracks in the foundation wall. Use Pordrän Tiivistysmassa.
- Foundation walls made of lightweight clinker blocks, hollow blocks, or lightweight concrete blocks must be grouted before installing Pordrän panels.
- Place the geotextile along the slope of the trench all the way down to the bottom of the trench so that it covers the area between the slope and the drainage layer/gravel. Allow for an overlap of approximately 250 mm. On slopes facing away from the trench, use a safety fabric along the vertical walls, but not over the drainage layer—use geotextile there instead. For more information on geotextile fabric/safety fabric, see Step 2.
- Select the correct stiffness for the Pordrän disc based on the excavation depth, backfill material, and whether the backfill will be compacted using a soil compactor weighing more than 100 kg. See the sizing table and technical specifications.
- Stormwater management must be ensured. Roof drainage, ground grading, and diversion must be carried out in a professional manner.
- The drainage pipe must be properly positioned vertically. The entire pipe must be located beneath the building’s structure; see the markings (!!) in the images. An exception to this may apply if the soil is very clayey, as lowering the drainage pipe could pose a risk of settlement in the building. The drainage pipe must be accessible for inspection along its entire length, and proper drainage must be ensured.
- While in storage at the construction site, the panels must be protected from physical damage and weather conditions.
- With Pordrän , you Pordrän backfill using existing material, even on large stones and frozen soil. Stones larger than 100 mm must be placed on the trench slope and must not come into contact with the Pordrän sheet or the geotextile.
Select the type of foundation wall and footing
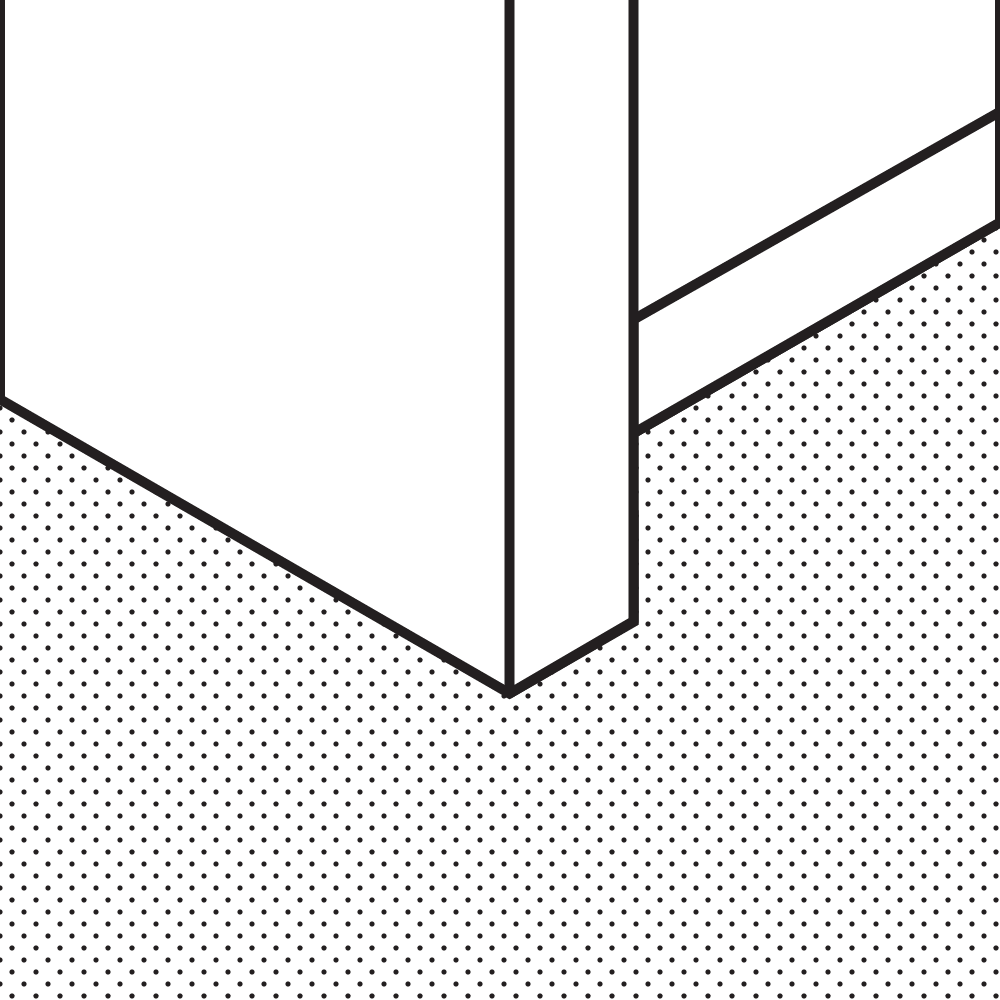
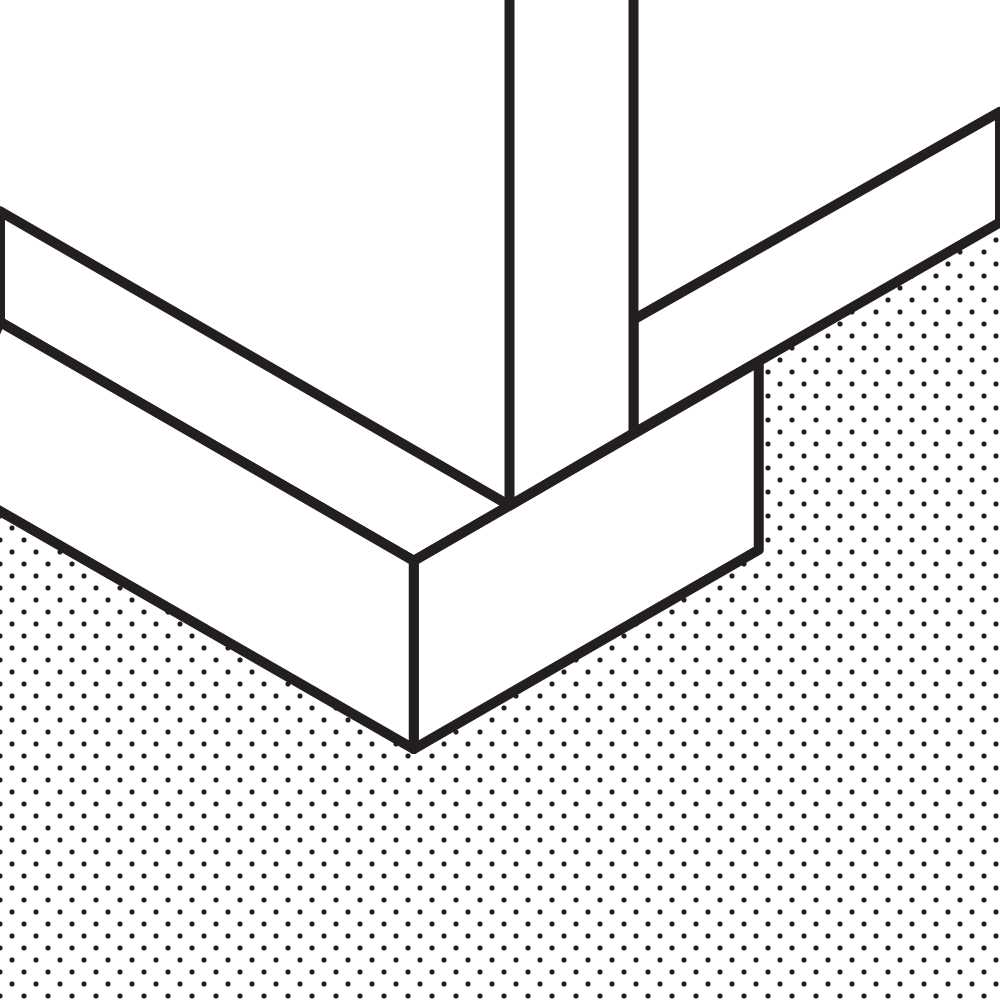
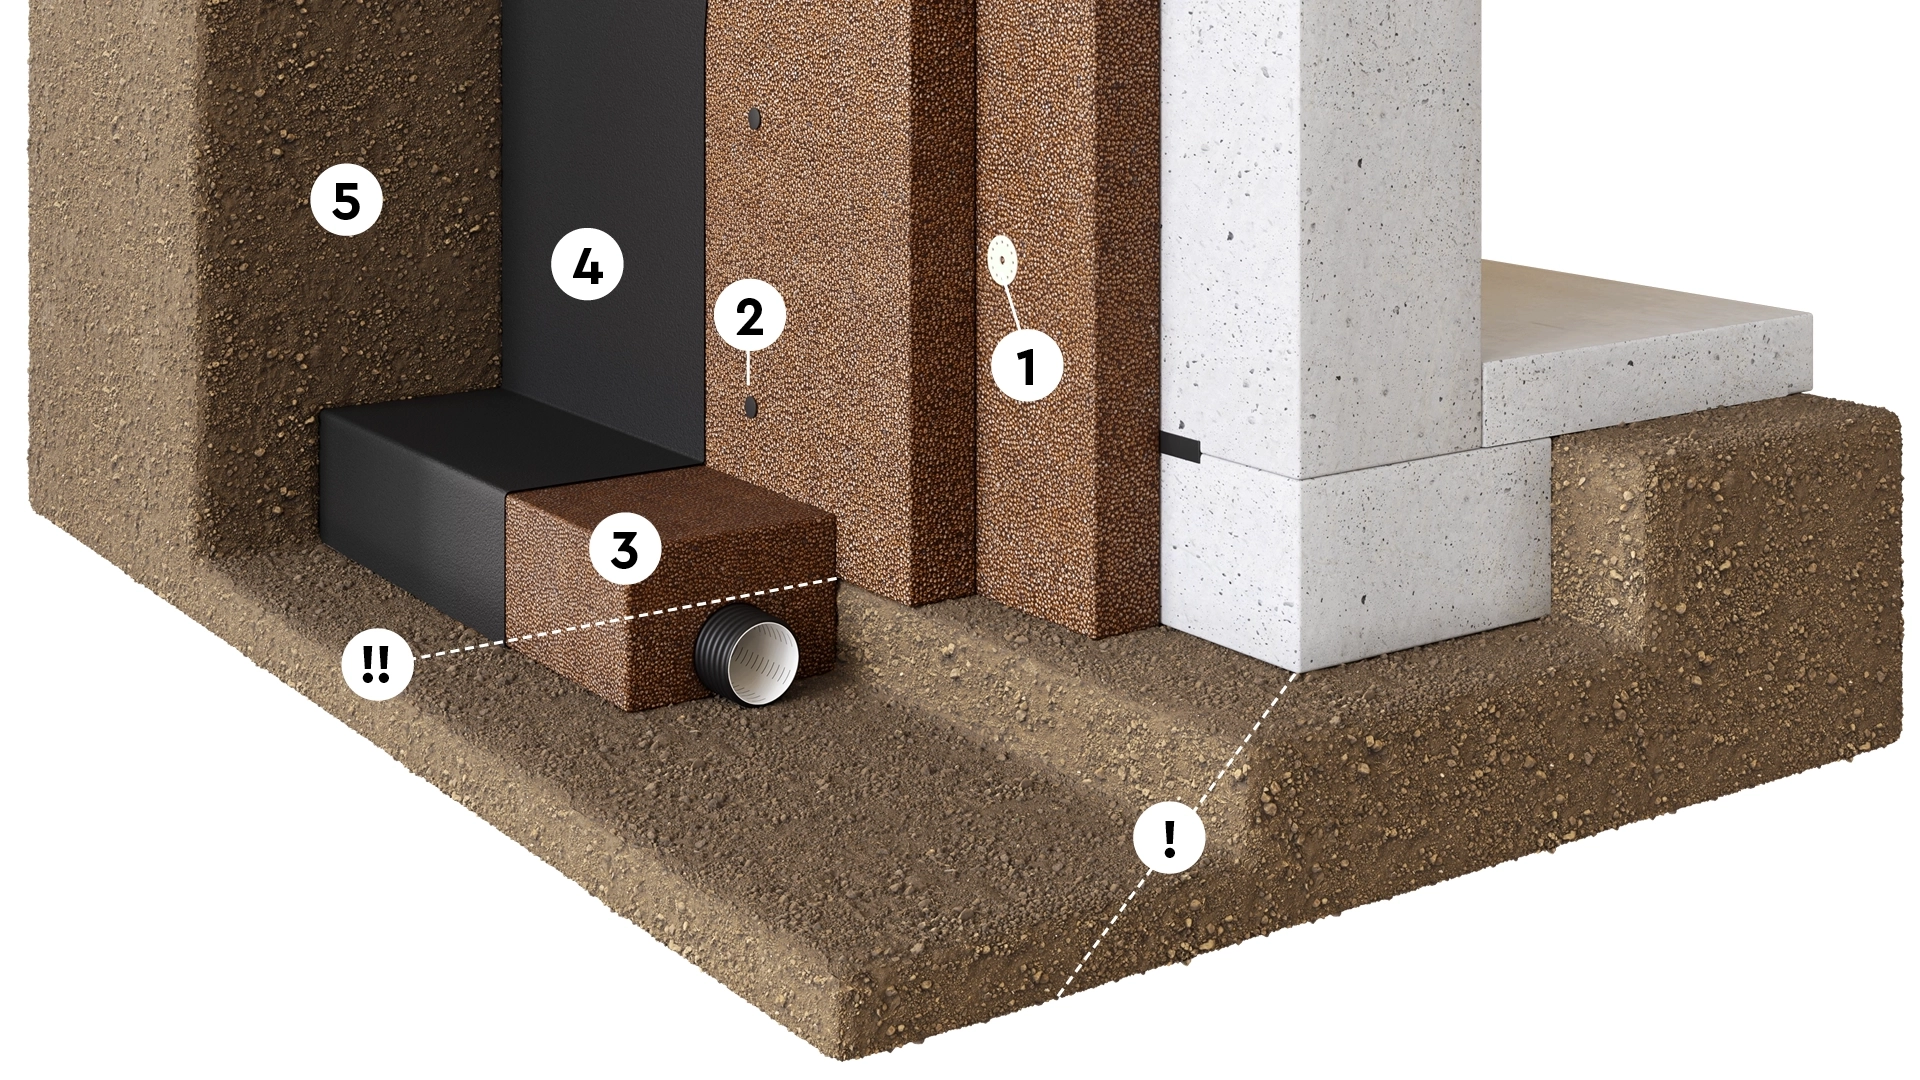
Without a protruding sole
With a drain plug
With gravel
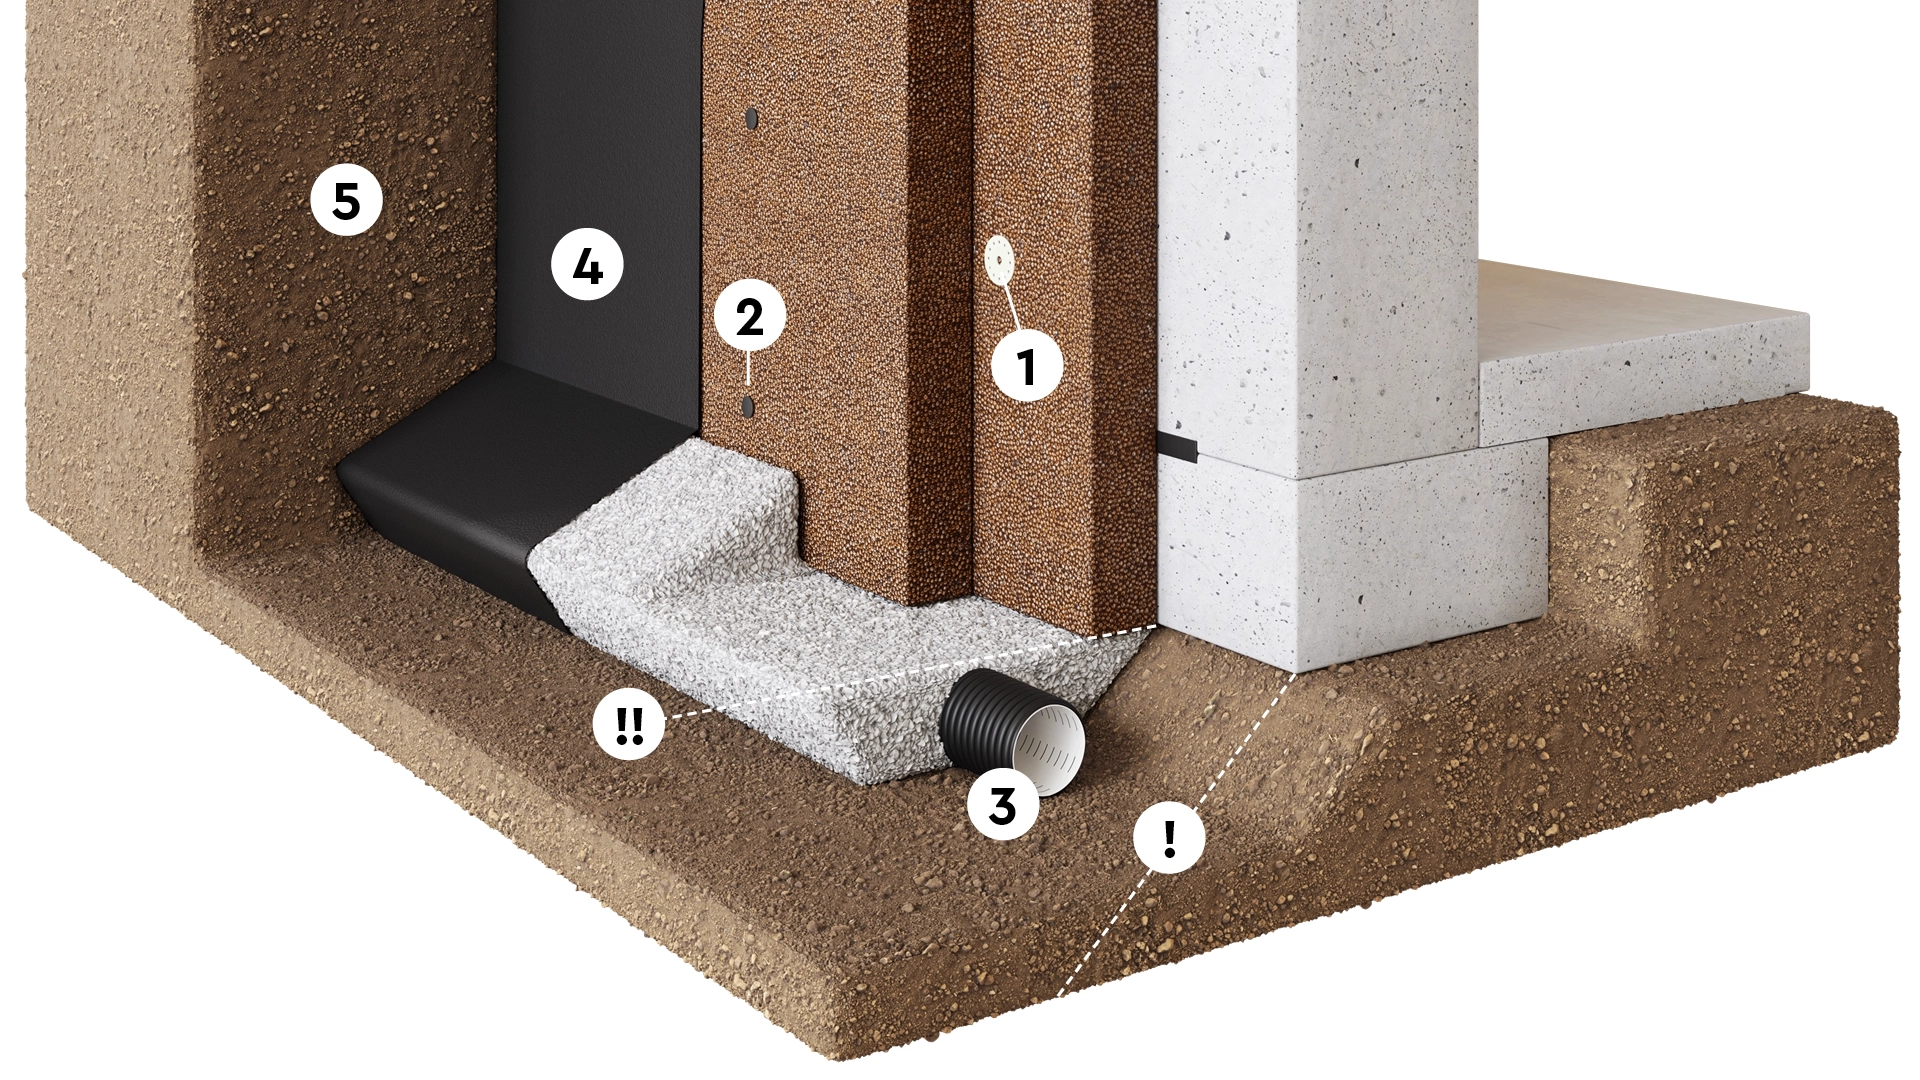
NOTE! Before you begin, carefully read through the basic requirements and all the steps in the instructions. Do not excavate within the load distribution angle—marked with (!) in the illustrations. The drainage pipe must be positioned correctly vertically. The entire pipe must be located beneath the building’s structure; see the marking (!!) in the illustrations.
- The first layer of Pordrän panels is installed against the basement wall using Pordrän —1–2 per panel. Drill through the panel into the wall using an 8 mm drill bit. Install the panels to a height of 30–50 mm below the intended finished ground level.
- If a second layer of Pordrän panels is installed, secure them to the first layer using Pordrän . Use approximately 4 fasteners per panel.
- Place the Pordränkloss or the drainage pipe and the gravel/crushed stone as shown in the illustrations. If you are using a drainage pipe with gravel/crushed stone, it is best to lay out the pipe and the base layer first before installing the panels.
- The geotextile and any geomembrane are installed as described in Step 2.
- The top cover strip is installed as described in step 3.
- Refilling is performed according to step 4.
With a raised sole
Less need for drying
Houses are often built on a foundation of crushed stone and cellular plastic insulation. An on-site assessment must be conducted in each individual case. If in doubt, choose Pordrän .
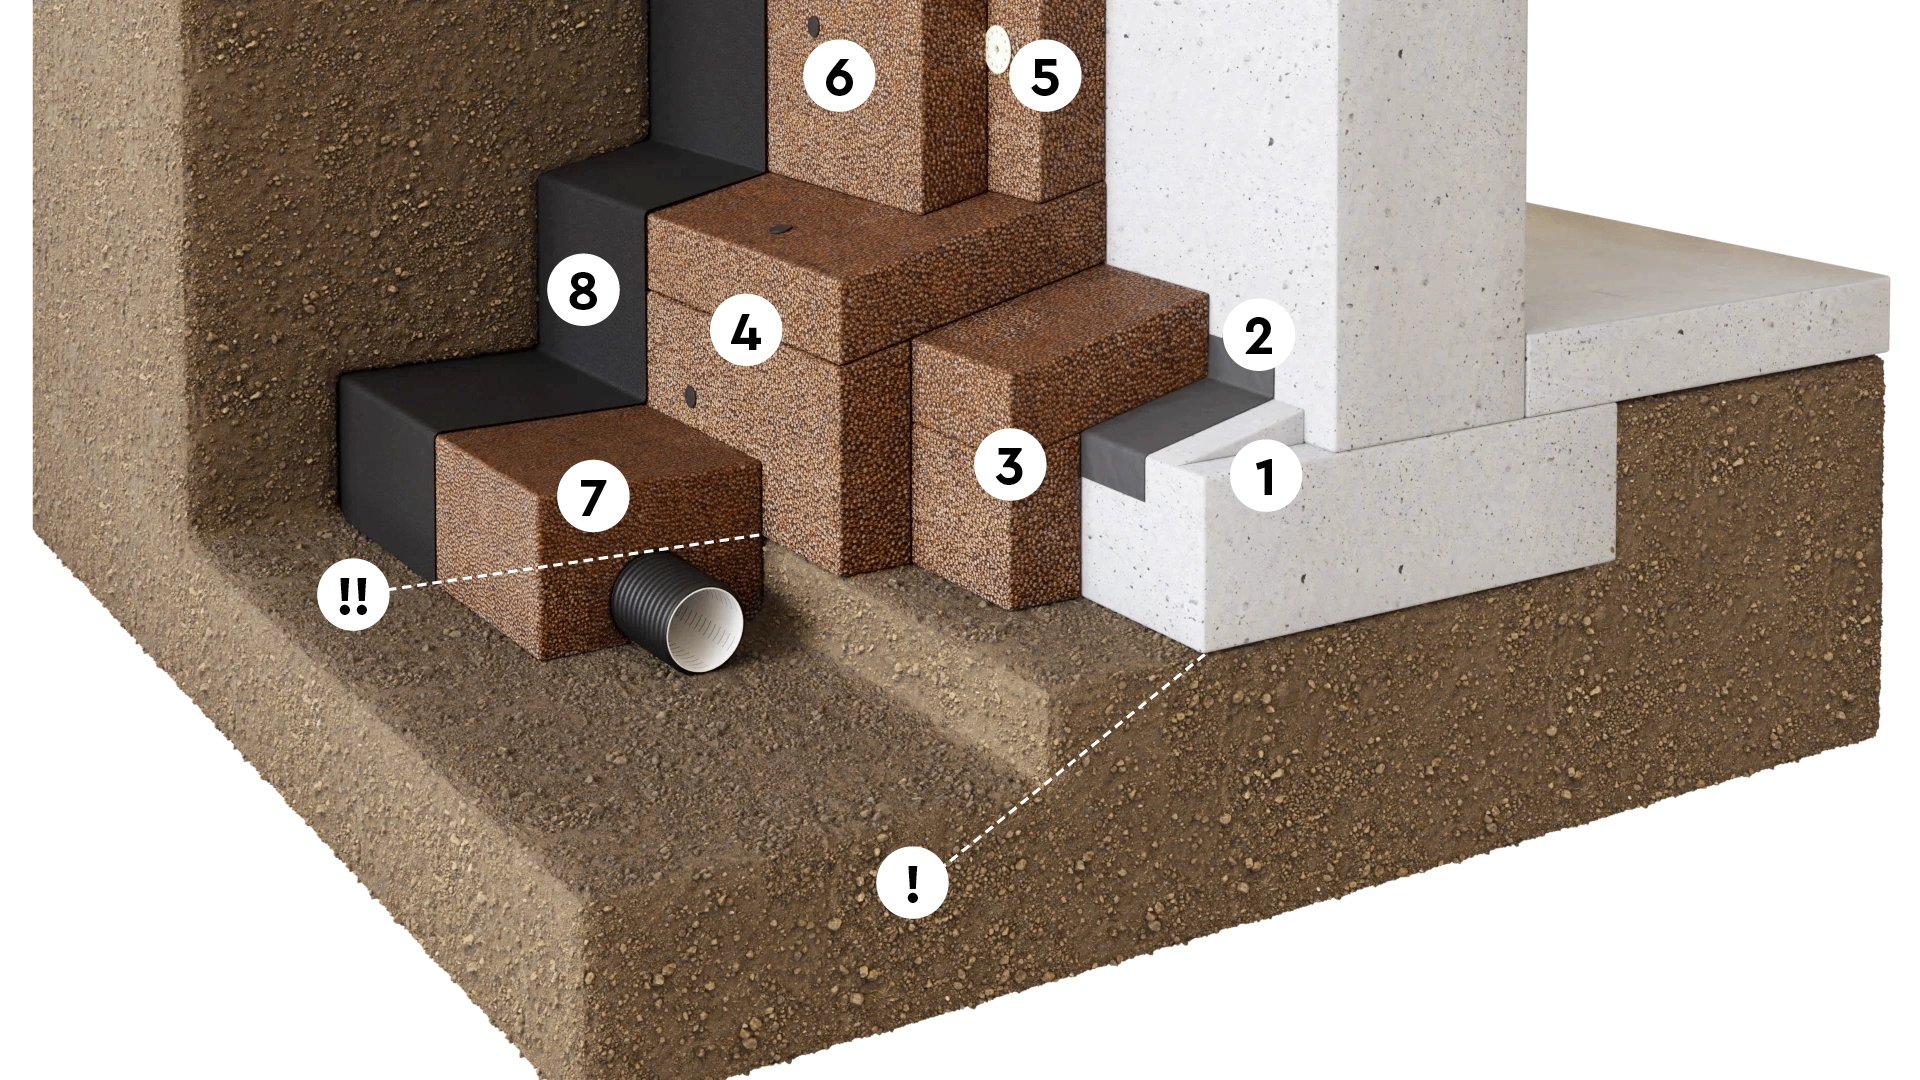
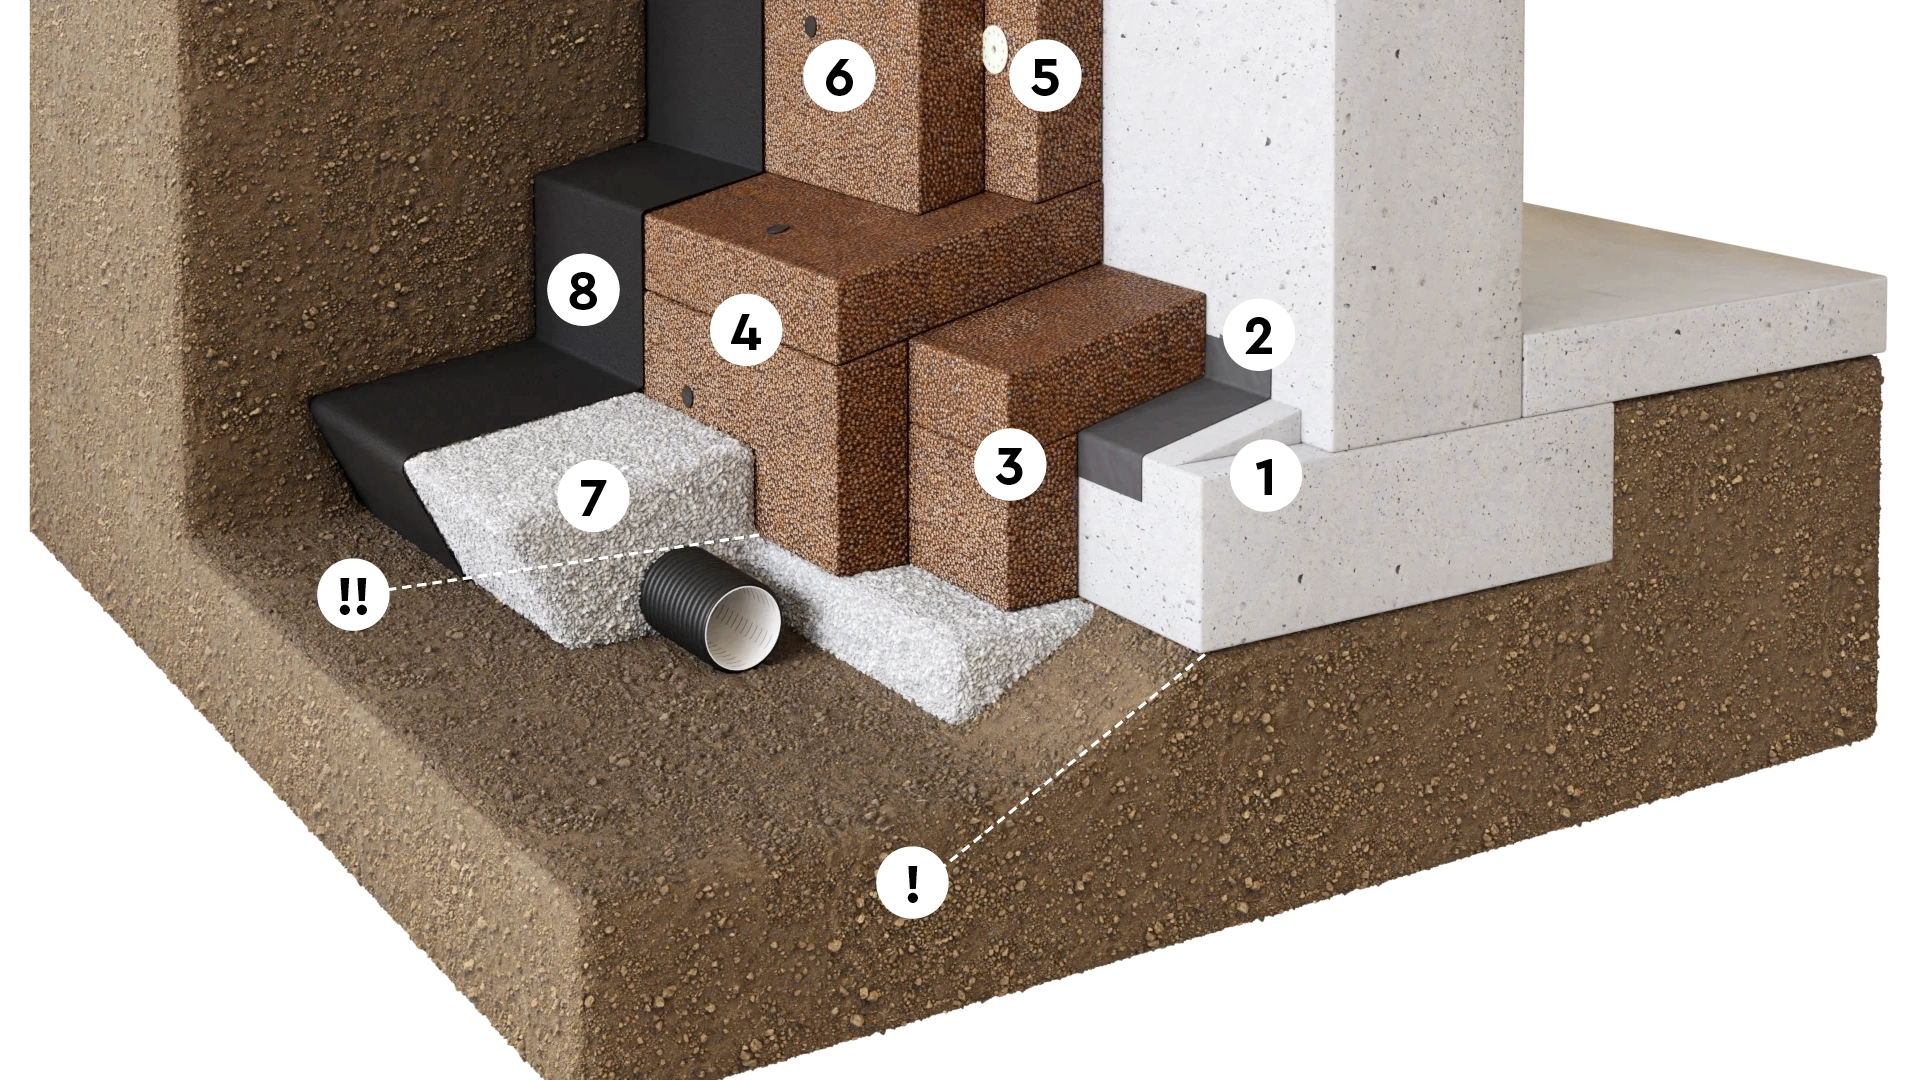
Greater need for drying
Houses are often built directly on the undisturbed subgrade without gravel or cellular plastic insulation. From a moisture protection standpoint, Pordrän is the safest method, as no waterproofing layers are applied directly to the structure.
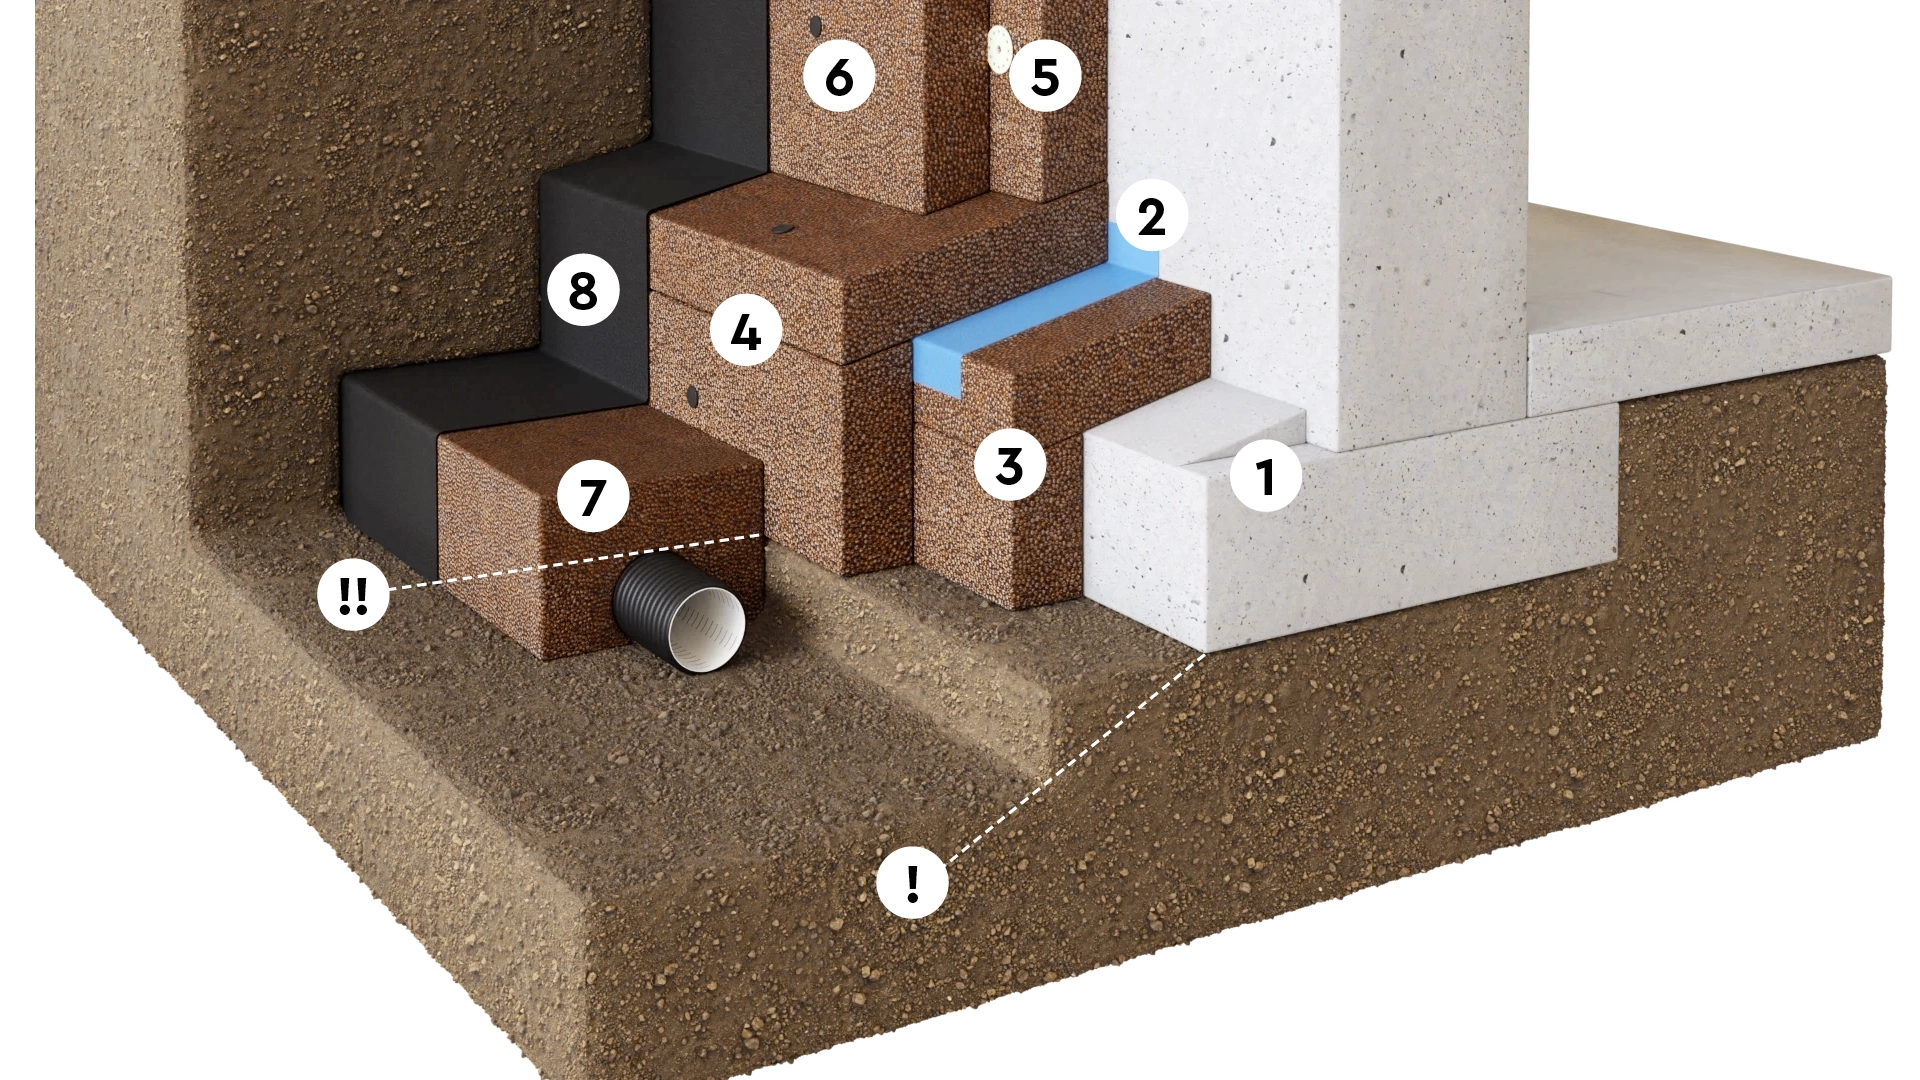
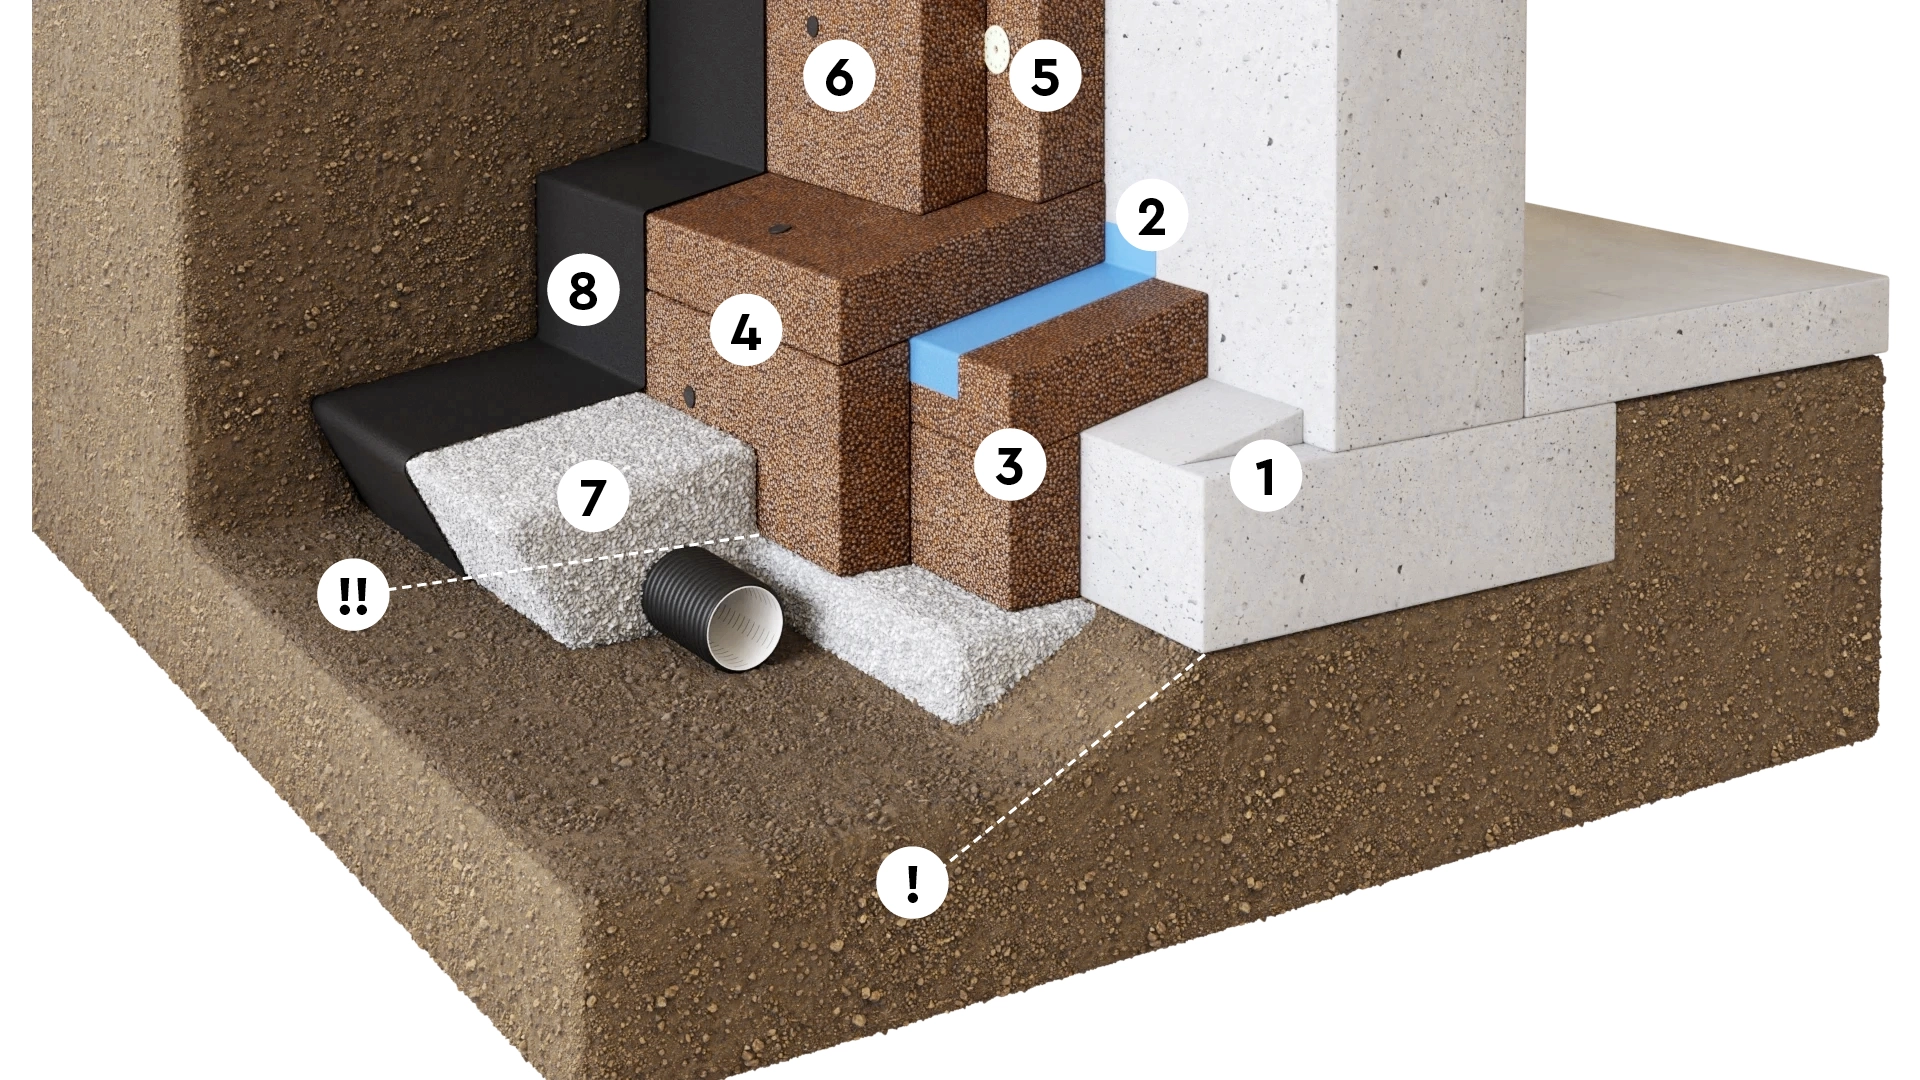
NOTE! Before you begin, carefully read through the basic requirements and all the steps in the instructions. Do not excavate within the load distribution angle—marked with (!) in the illustrations. The drainage pipe must be positioned correctly vertically. The entire pipe must be located beneath the building’s structure; see the marking (!!) in the illustrations.
- If the protruding sole lacks a slope, a sloped surface/cement levelling layer is poured on top of the sole, with a slope of approximately 20 degrees.
- Select a method for the membrane: Pordrän (requires less drying) or Pordrän (requires more drying)
- Fit the Pordrän panels. Secure the first layer to the base using Pordrän . If you are using plastic sheeting, place it on top of the first layer as shown in the picture.
- The second layer is secured using Pordrän in the first layer of Pordrän panels.
- The first layer of Pordrän panels is installed against the basement wall using Pordrän —1–2 per panel. Drill through the panel into the wall using an 8 mm drill bit. Install the panels at a height of 30–50 mm below the intended finished ground level.
- If a second layer of Pordrän panels is installed, secure them to the first layer using Pordrän . Use approximately 4 fasteners per panel.
- Place the Pordränkloss or the drainage pipe and the gravel/crushed stone as shown in the pictures. If you are using a drainage pipe with gravel/crushed stone, it is best to lay the pipe and the base layer first before installing the panels.
- The geotextile and any geomembrane are installed as described in Step 2.
- The top cover strip is installed as described in step 3.
- Refilling is performed according to step 4.
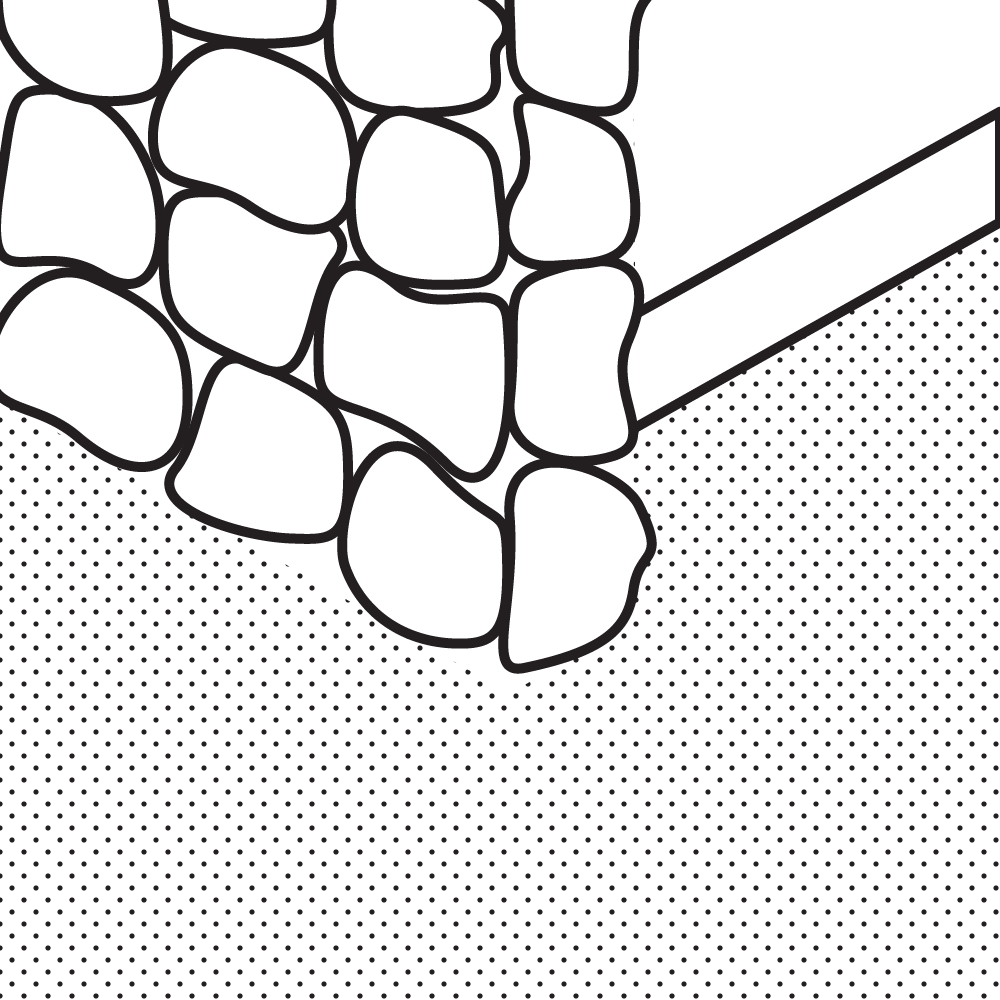
With an uneven stone foundation
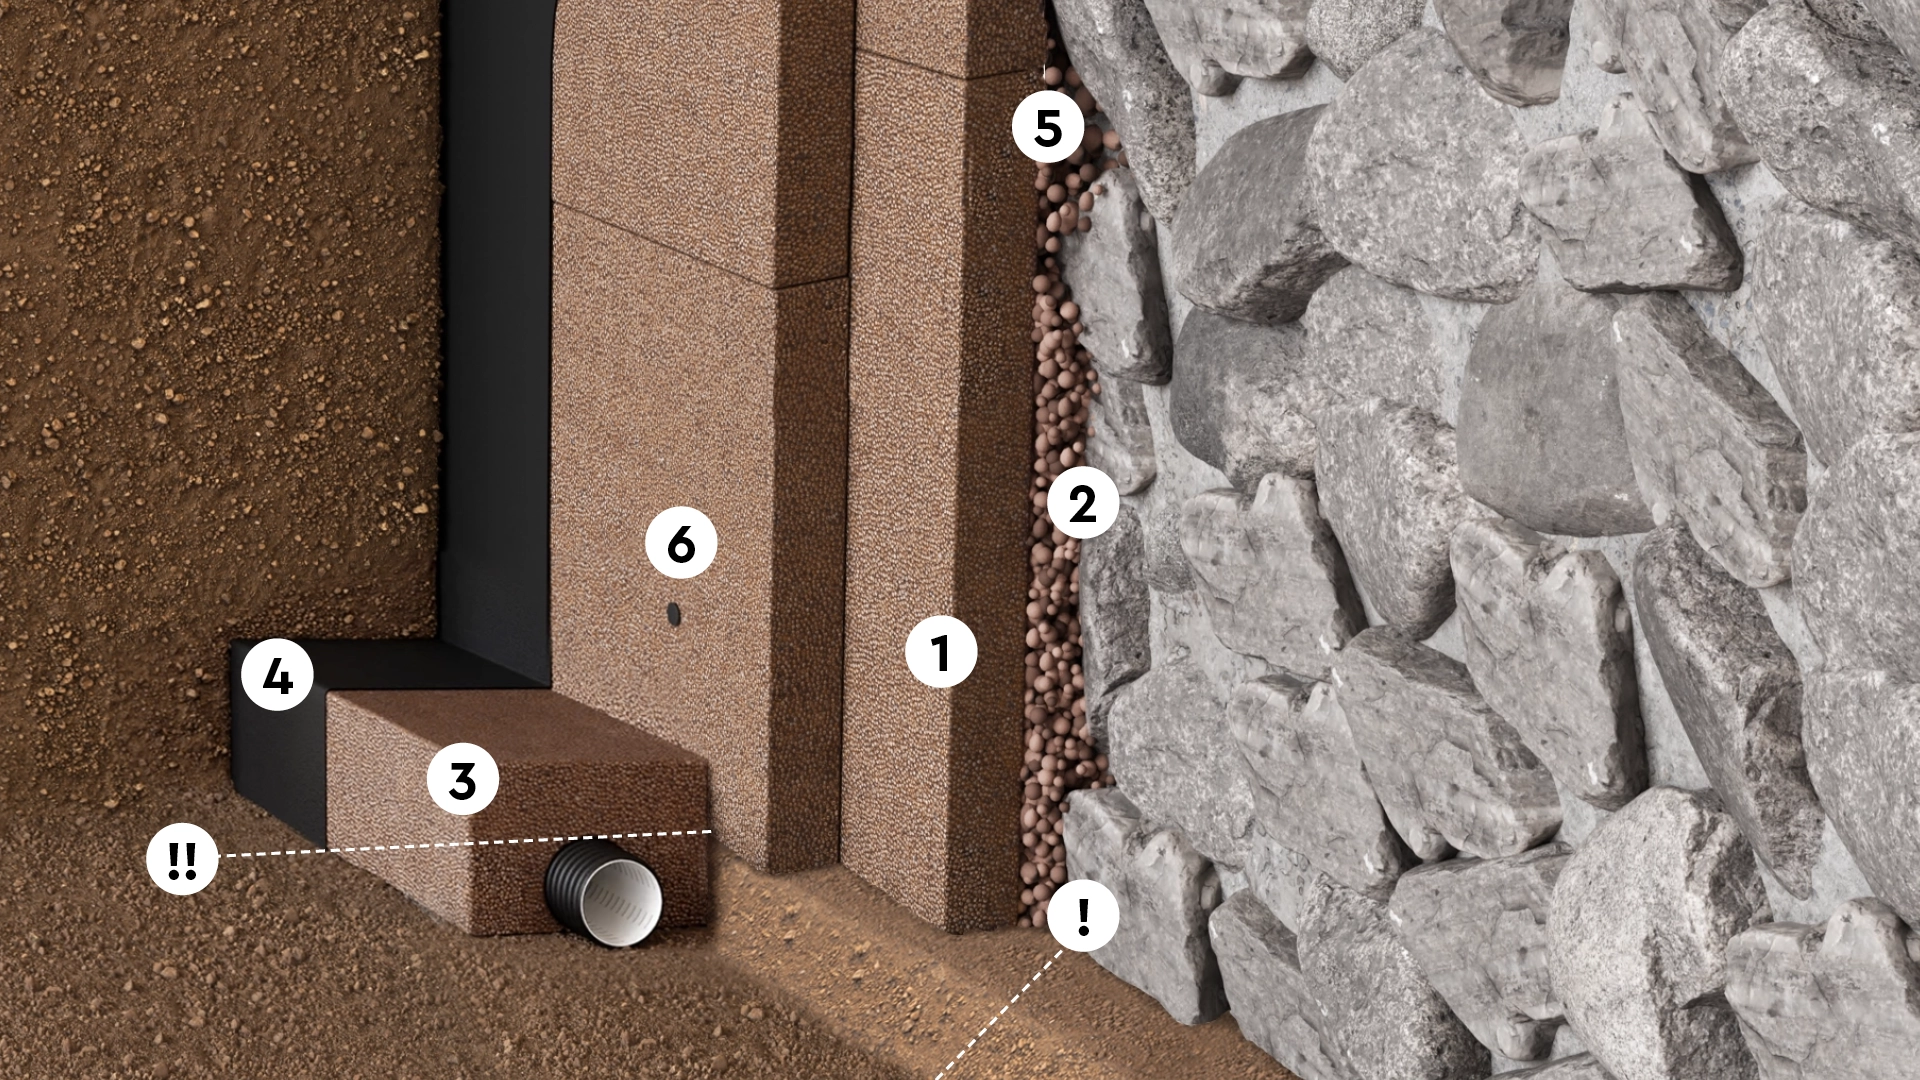
When the basement wall is made of uneven natural stones, there are two options. You can either plaster or render the basement wall to make it smooth, or follow the instructions in the pictures.
With Pordrän
With gravel
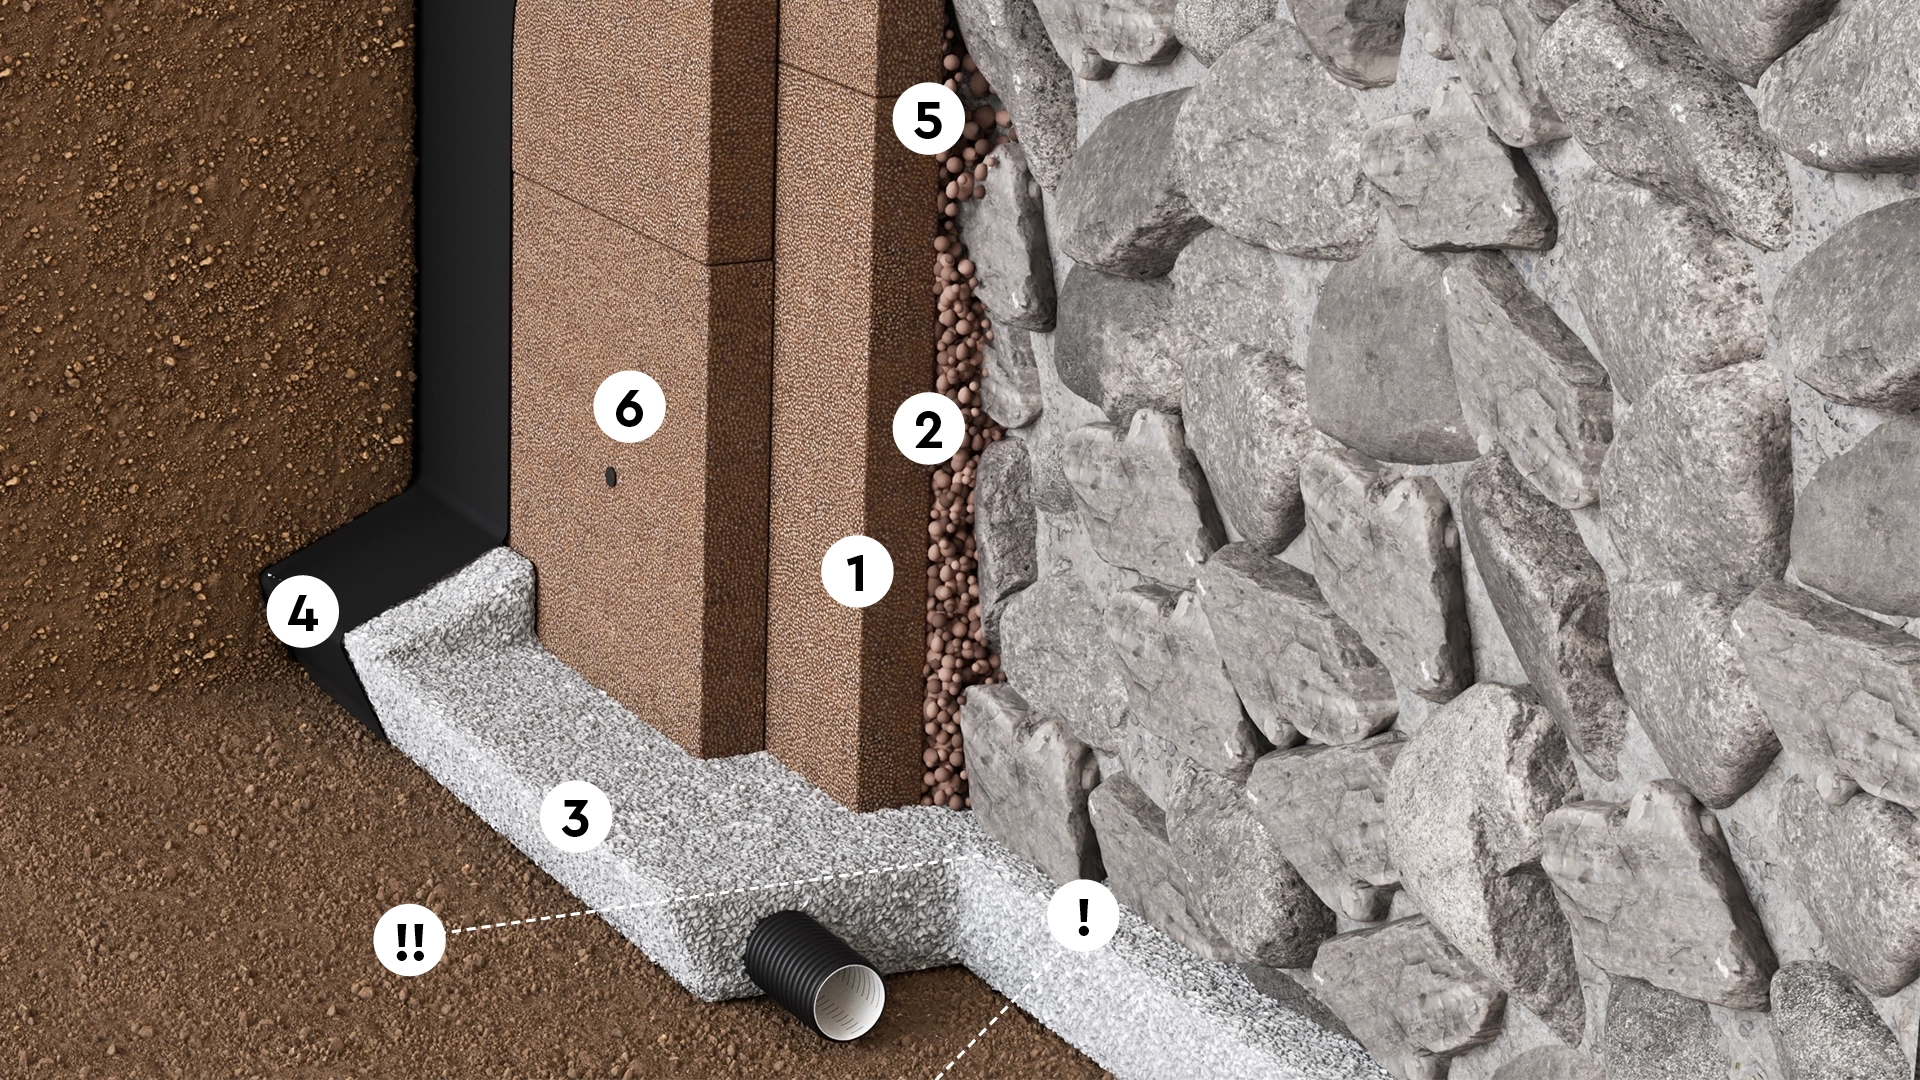
NOTE! Before you begin, carefully read through the basic requirements and all the steps in the instructions. Do not excavate within the load distribution angle—marked with (!) in the illustrations. The drainage pipe must be positioned correctly vertically. The entire pipe must be located beneath the building’s structure; see the marking (!!) in the illustrations.
- Position the Pordrän panel flush with the stone that protrudes the most. The panels must be installed vertically and must not be tilted.
- Fill the gaps between the Pordrän panel and the uneven stone foundation with loose lightweight aggregate/LECA.
- Install a Pordränk drain or a drainage pipe backfilled with crushed stone.
- Make sure the geotextile covers the entire way down to the bottom of the trench between the trench slope and Pordrän or the gravel.
- Alternately backfill with loose lightweight aggregate/LECA between the Pordrän slab and the basement wall, and with existing fill between the shaft slope and the geotextile.
- The second layer of Pordrän panels is secured to the first layer using Pordrän . Use approximately 4 fasteners per panel.
- Install the top cover strip as described in step 3. If the distance between the building’s foundation and the Pordränskiva exceeds 200 mm, please contact us.
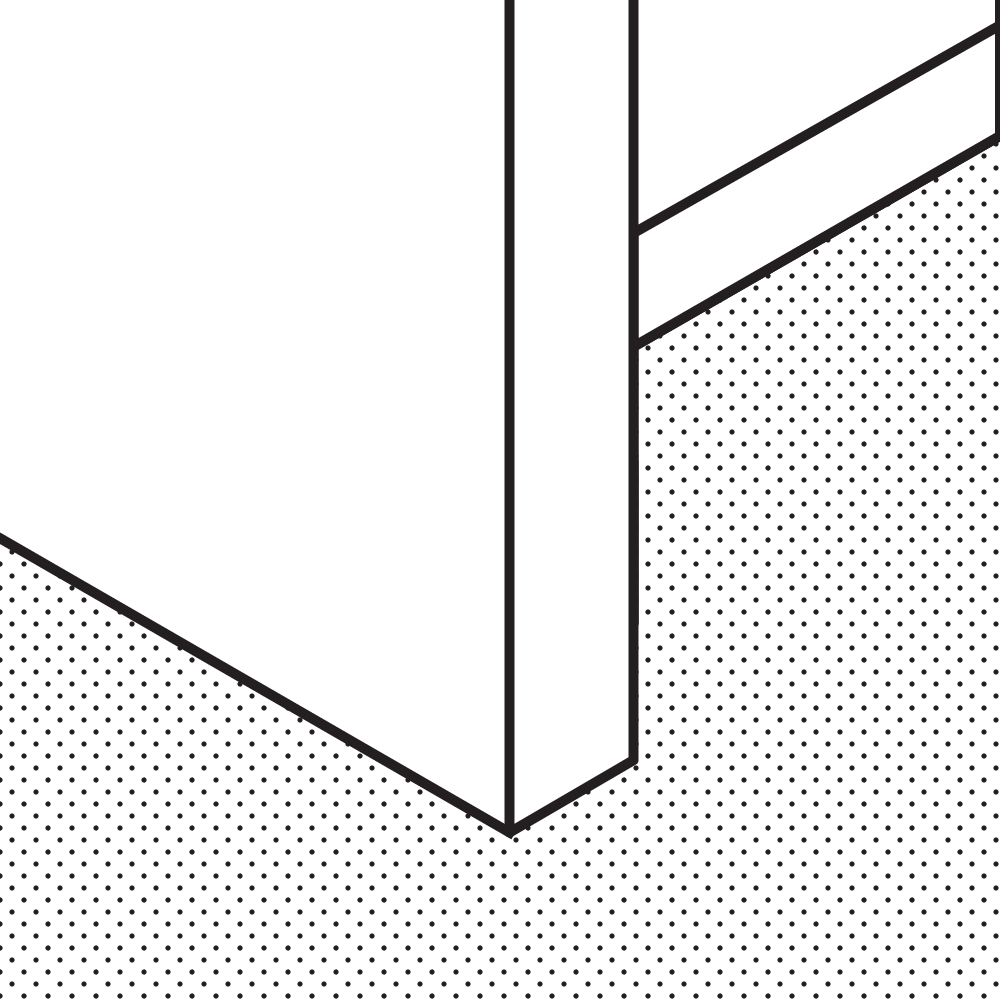
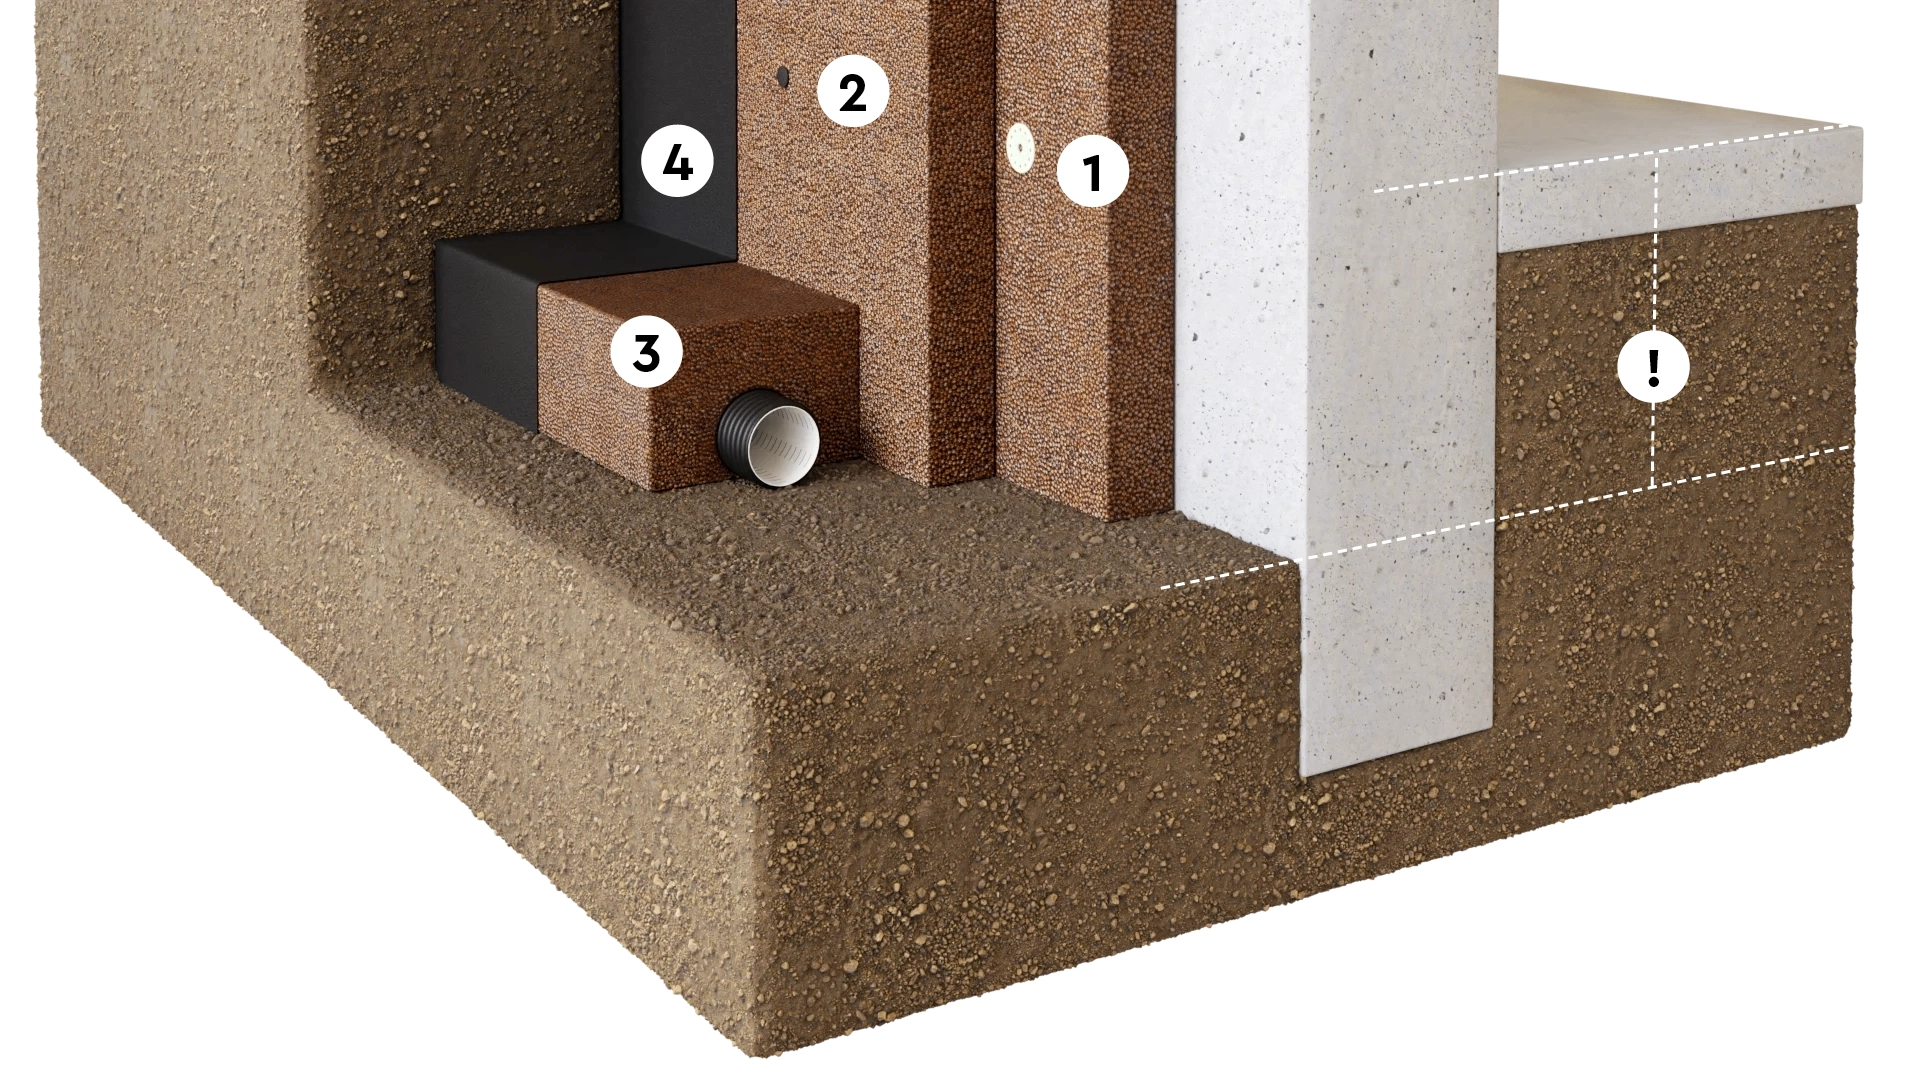
Deep foundation
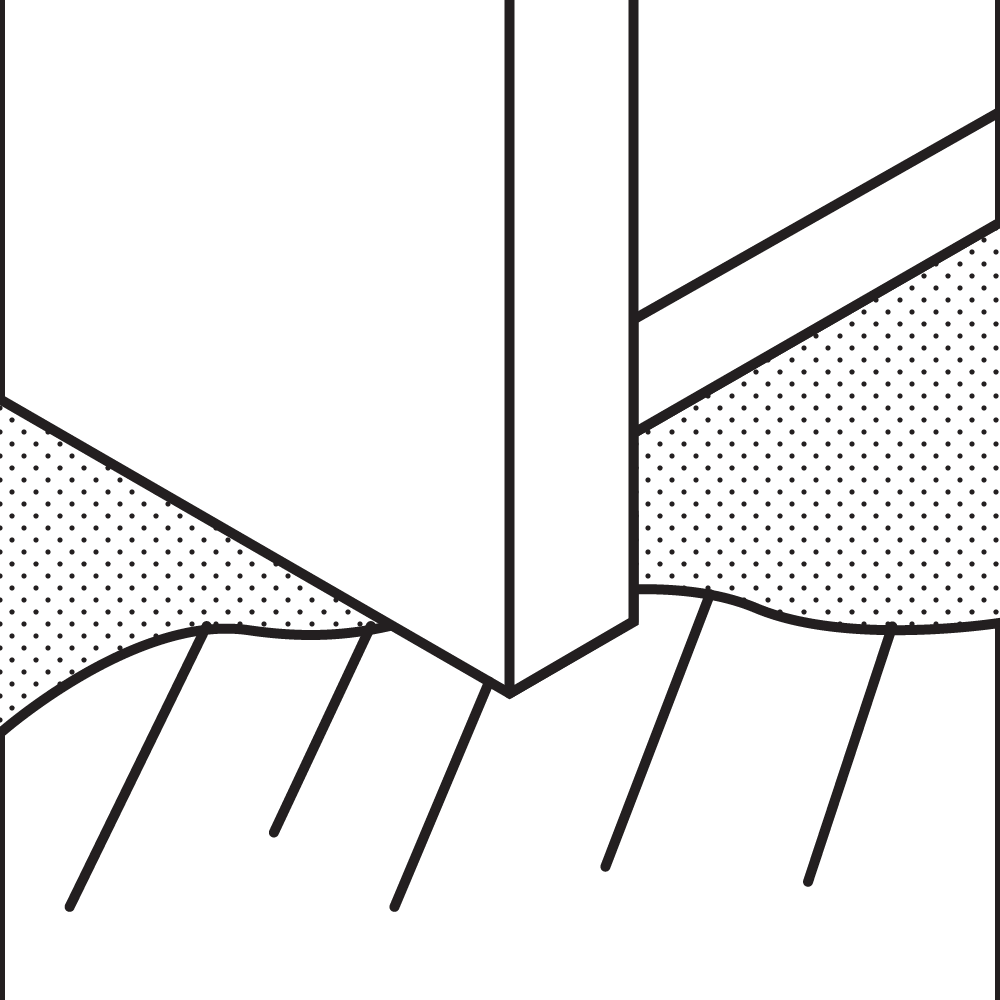
If the building has deep foundations, the trench should end 500 mm below the top edge of the basement floor on the interior side, and the Pordränkloss or drainage pipe should be placed at that level. See the mark (!) in the images.
With Pordrän
With gravel
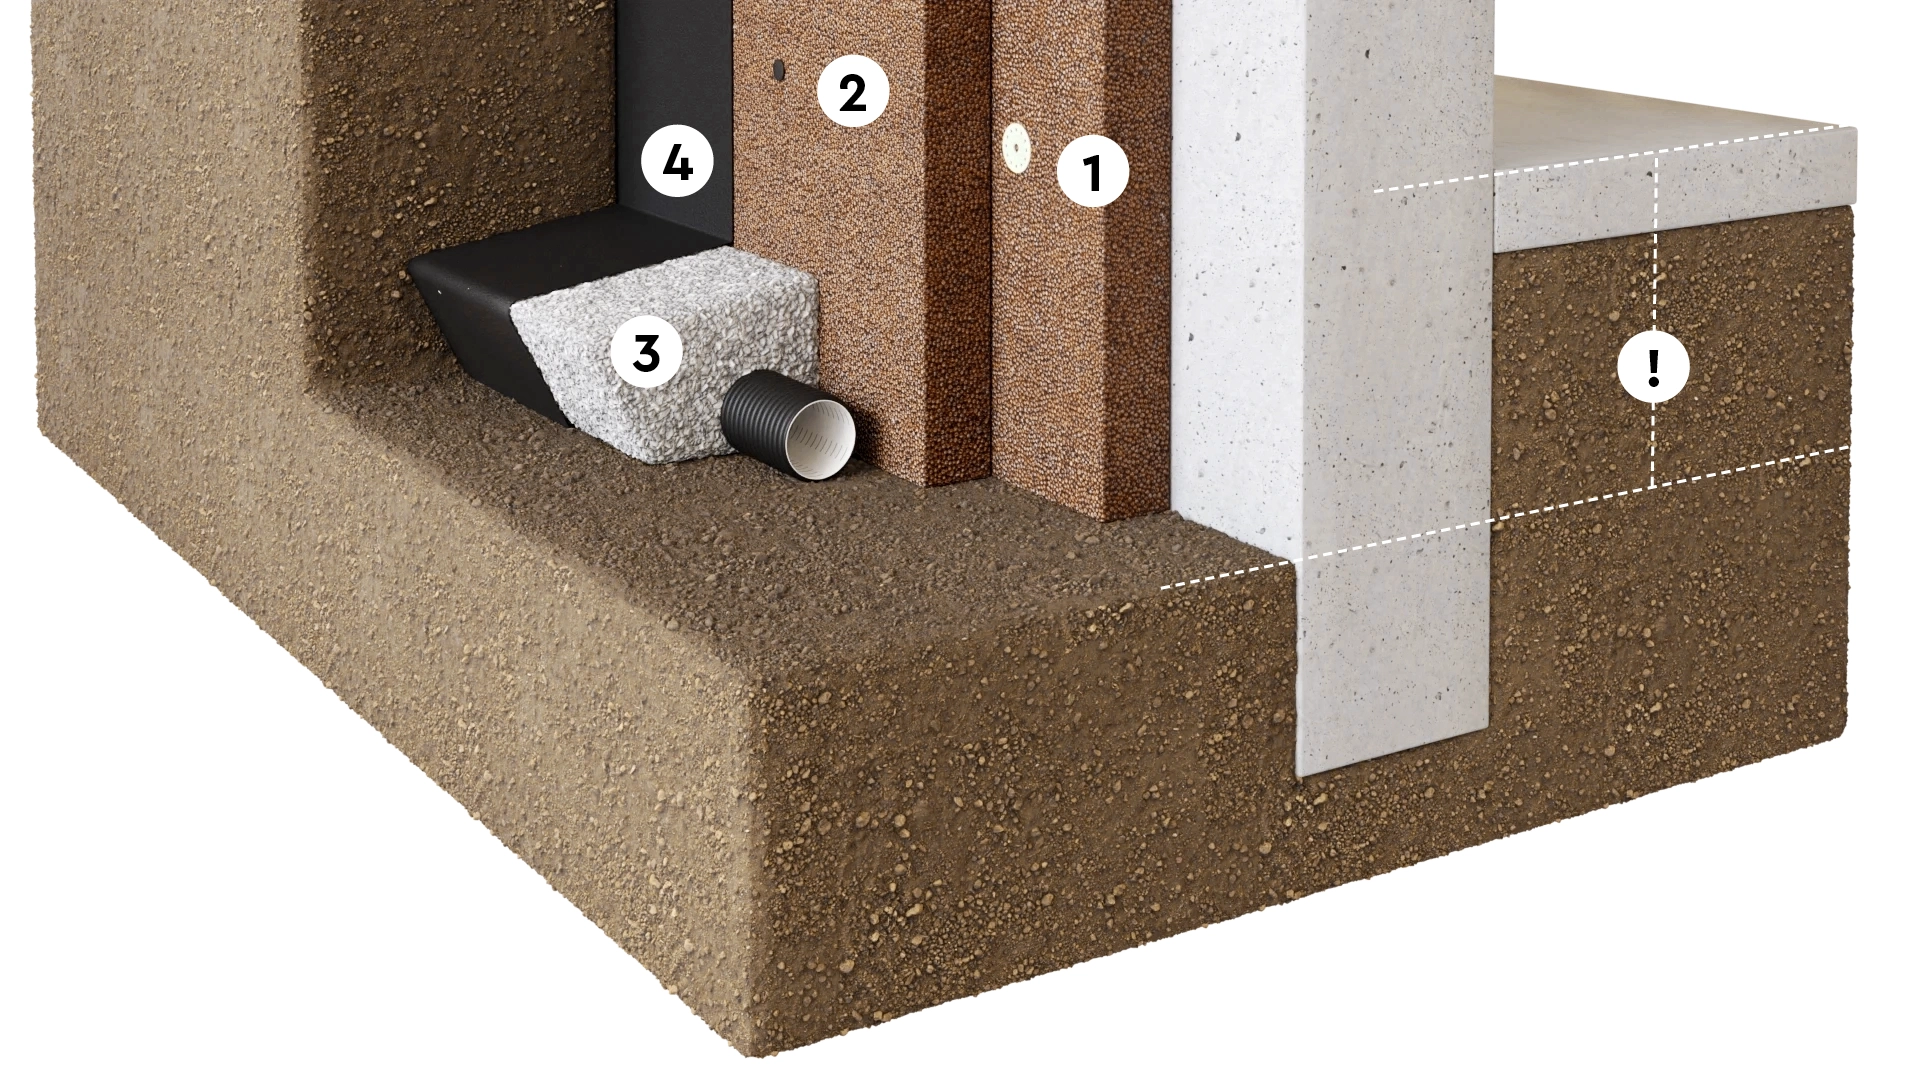
NOTE: Before you begin, please read the prerequisites and all the steps in the instructions carefully.
- The first layer of Pordrän panels is installed against the basement wall using Pordrän —1–2 per panel. Drill through the panel into the wall using an 8 mm drill bit. Install the panels to a height of 30–50 mm below the intended finished ground level.
- If a second layer of Pordrän panels is installed, secure them to the first layer using Pordrän . Use approximately 4 fasteners per panel.
- Place the drain grate or drain pipe and the gravel/crushed stone as shown in the illustrations.
- The geotextile and any geomembrane are installed as described in Step 2.
- The top cover strip is installed as described in step 3.
- Refilling is performed according to step 4.
On bedrock
If the building is founded on bedrock, you may have to avoid routing the drainage pipe beneath the building’s structure; see the images below. Alternatively, you can blast away the bedrock or cut a channel into it. Which solution you choose is a matter of risk assessment and cost.
With Pordrän
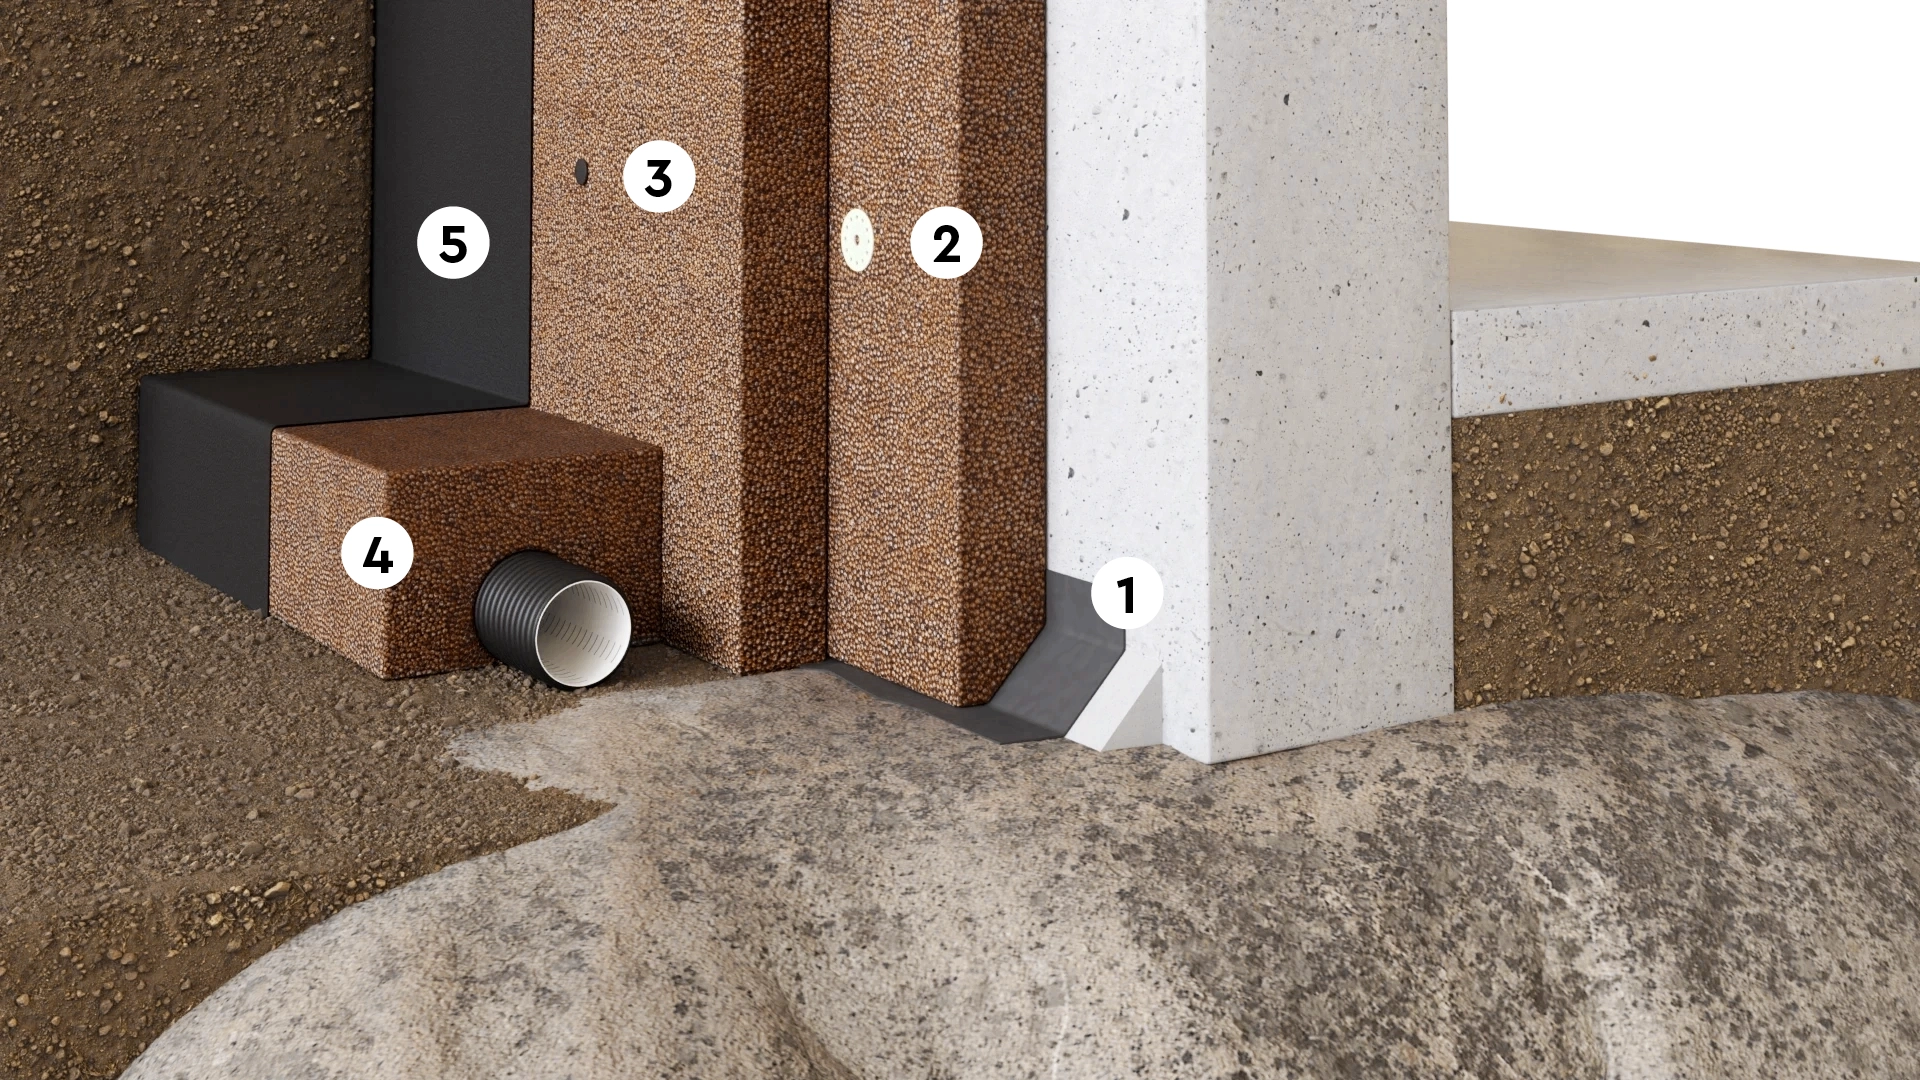
With gravel
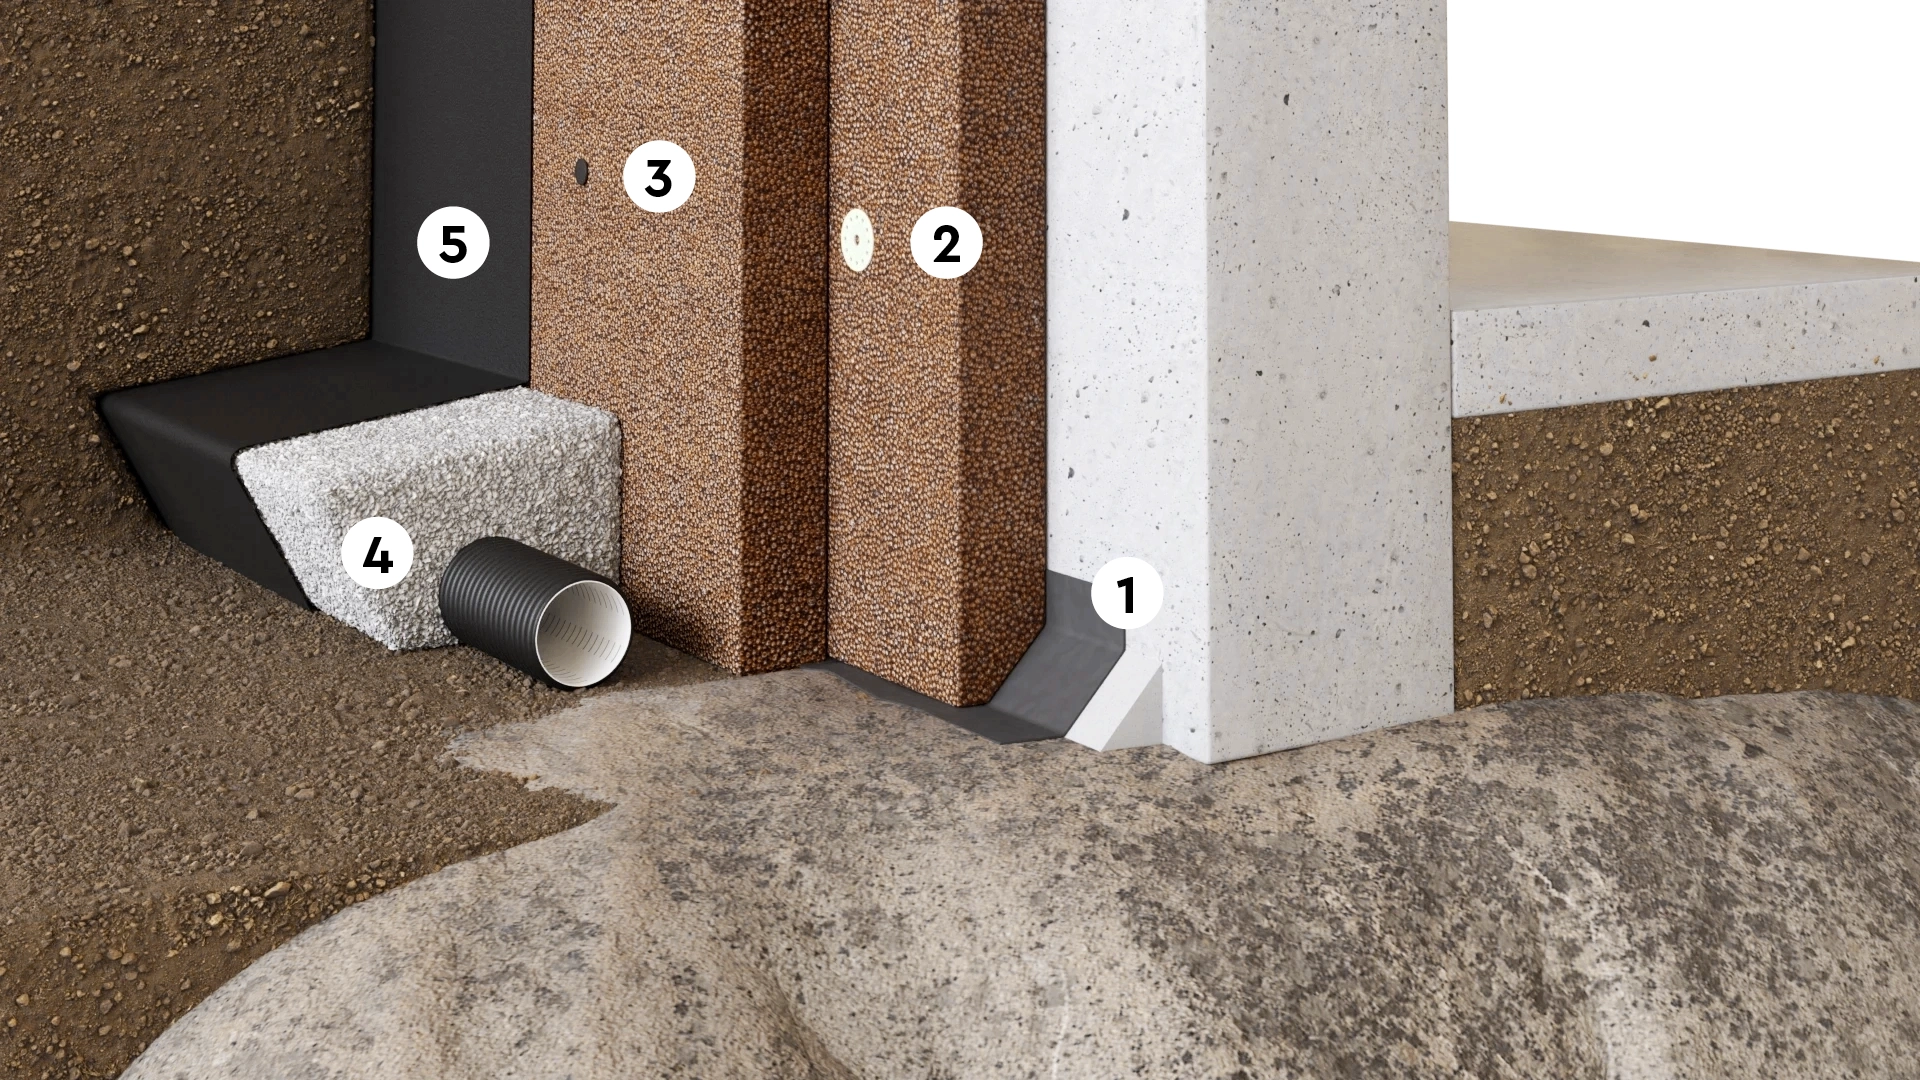
NOTE: Before you begin, please read the prerequisites and all the steps in the instructions carefully.
- Pour a sloped cement mortar screed and seal it with Pordrän as shown in the image above.
- The first layer of Pordrän panels is installed against the basement wall using Pordrän —1–2 per panel. Drill through the panel into the wall using an 8 mm drill bit. Install the panels to a height of 30–50 mm below the intended finished ground level.
- If a second layer of Pordrän panels is installed, secure them to the first layer using Pordrän . Use approximately 4 fasteners per panel.
- Place the drain grate or drain pipe and the gravel/crushed stone as shown in the illustrations.
- The geotextile and any geomembrane are installed as described in Step 2.
- The top cover strip is installed as described in step 3.
- Refilling is performed according to step 4.
Step 2
Fiber and safety fabric
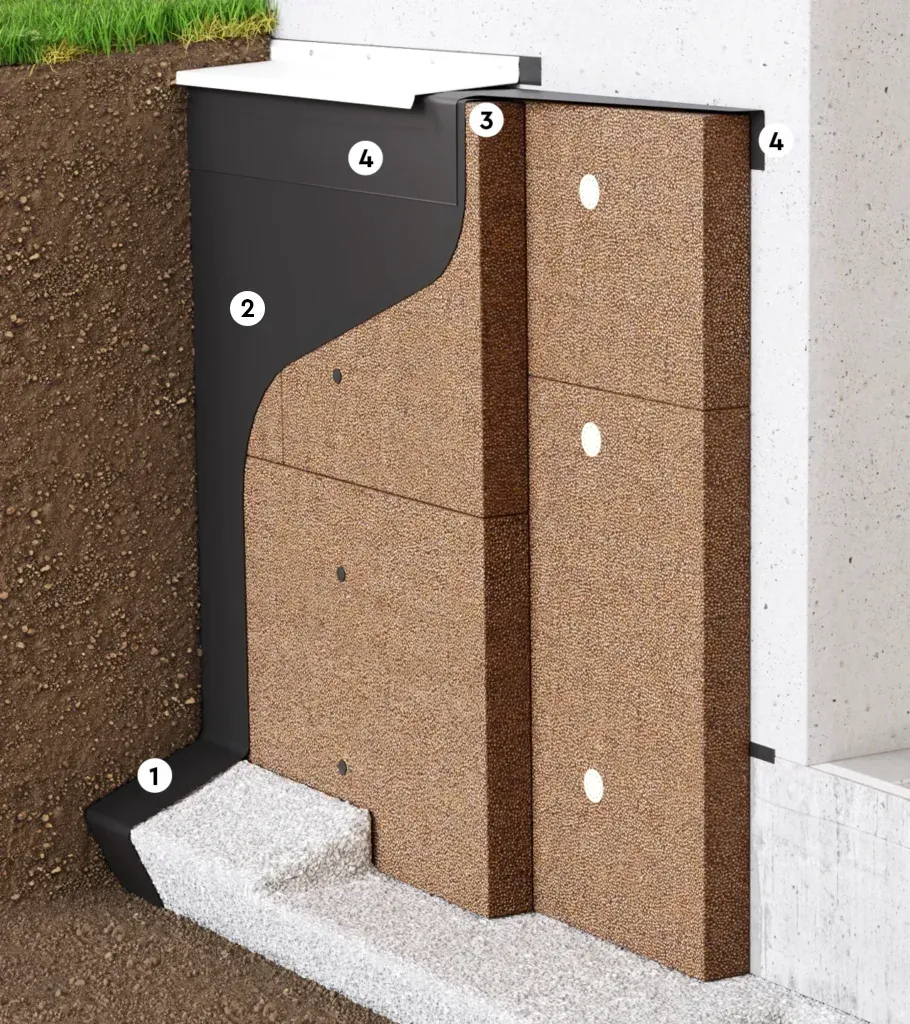
Geotextile fabric is the most common method. Geomembrane is used on slopes and in trenches deeper than 3 meters. The geomembrane must not be spread over Pordrän or the drainage layer; it must only be used vertically, as shown in the images.
Nonwoven fabric
Safety net
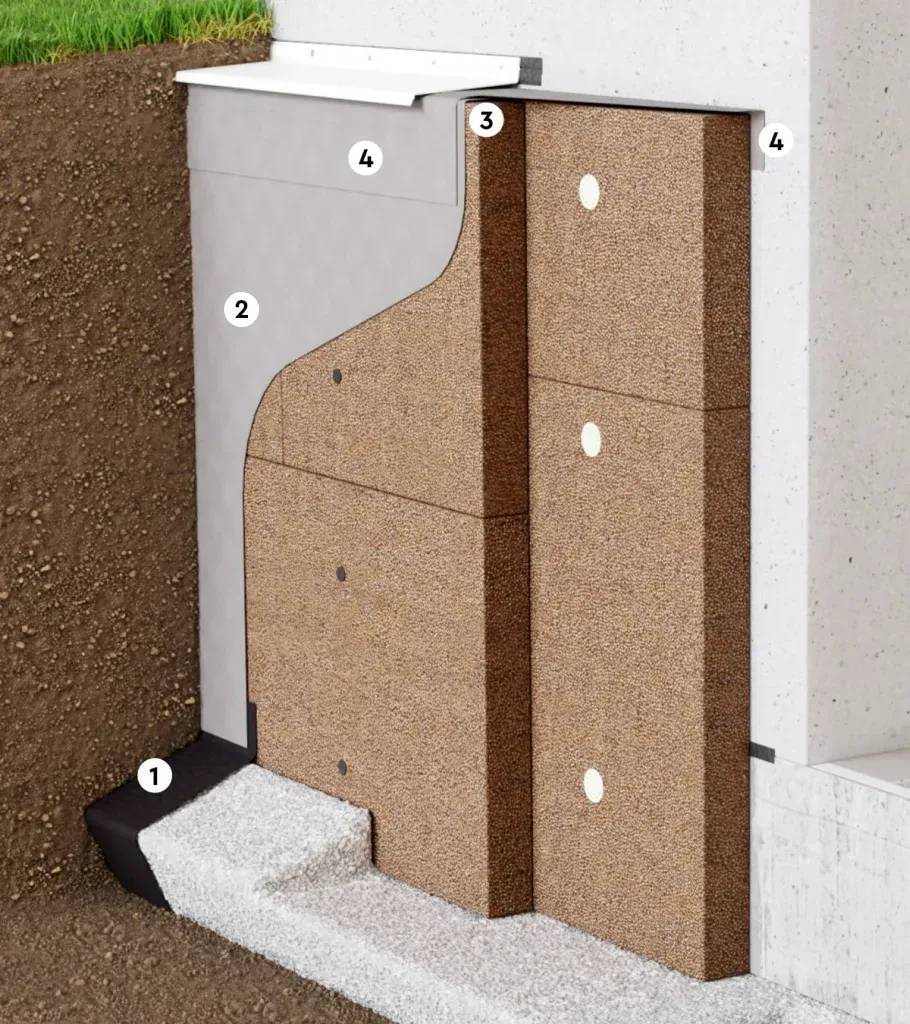
NOTE: Before you begin, please read the prerequisites and all the steps in the instructions carefully.
- Make sure the geotextile covers the entire area all the way down to the bottom of the trench, between the trench slope and the Pordränkloss or the gravel drainage layer.
- An overlap of approximately 250 mm is required.
- The geotextile coming from below must not be attached to the cover strip; instead, it must be folded around the upper edge and behind the Pordrän panel, as shown in the illustration. On sloping terrain or in trenches deeper than 3 meters, the vertical geotextile must be replaced with a safety geotextile, as shown in the illustration; the safety geotextile must never be folded out over the Pordrän panel or the macadam drainage layer, see illustration.
- Finish installing the geotextile/protective fabric by folding it over as shown in the pictures.
Step 3
Cover list
Over the fabric
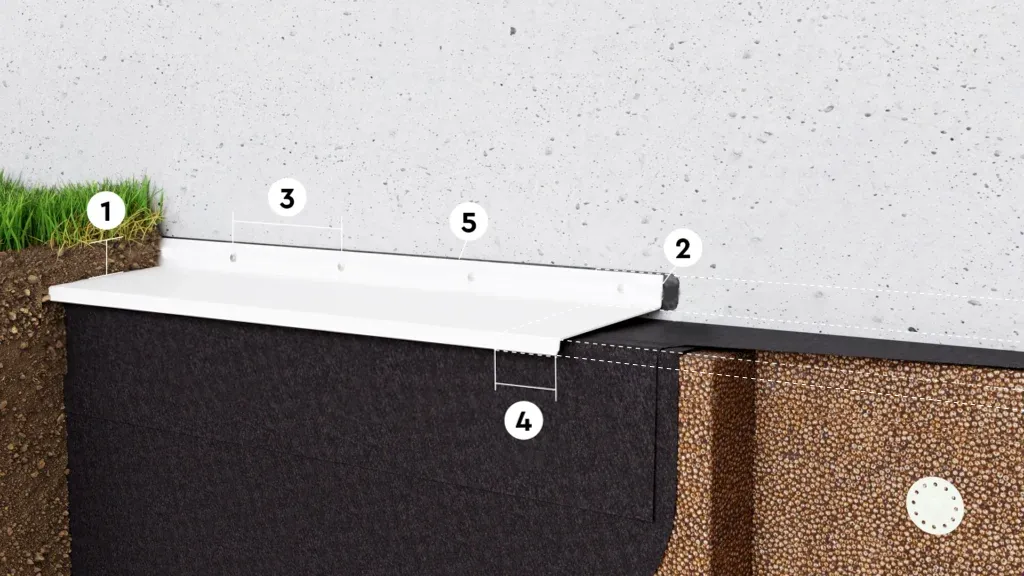
Over the safety net
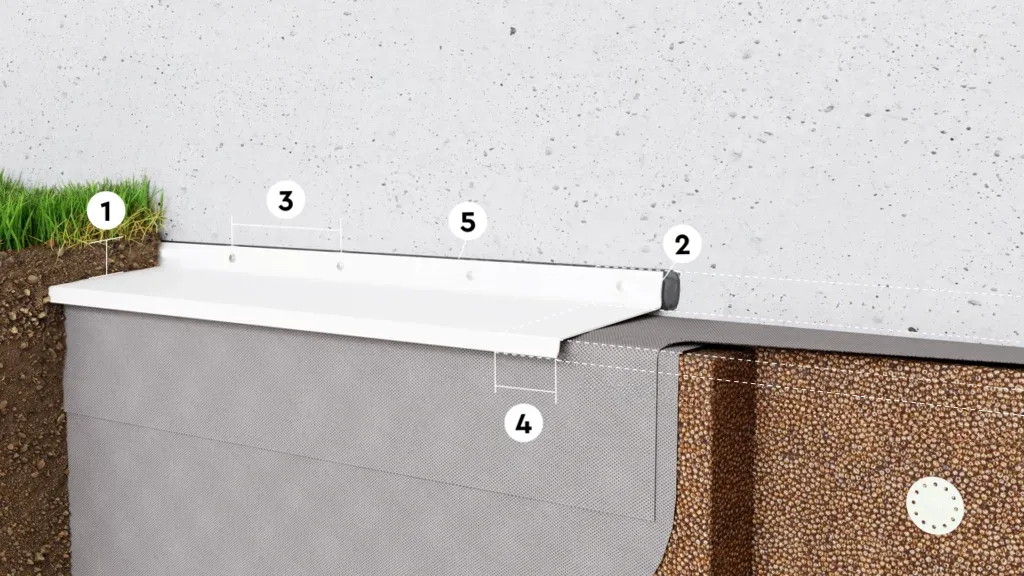
NOTE: Before you begin, please read the prerequisites and all the steps in the instructions carefully.
- Measure so that the trim will sit 30–50 mm below the finished ground level.
- Apply a bead of Pordrän Tiivistysmassa the trim before installation.
- Secure the trim with Pordrän , c/c ≤150 mm. If the wall is uneven, the rivets may need to be placed closer together.
- Joints in the cover strip must overlap by at least 50 mm. In corners, use Pordrän or straight strips laid in a staggered pattern and sealed with Pordrän Tiivistysmassa. Our corner cover strips are available for both outside and inside corners.
- The installation of trim moldings is completed by applying a bead of Pordrän Tiivistysmassa the joint between the wall and the molding.
Step 4
Refill
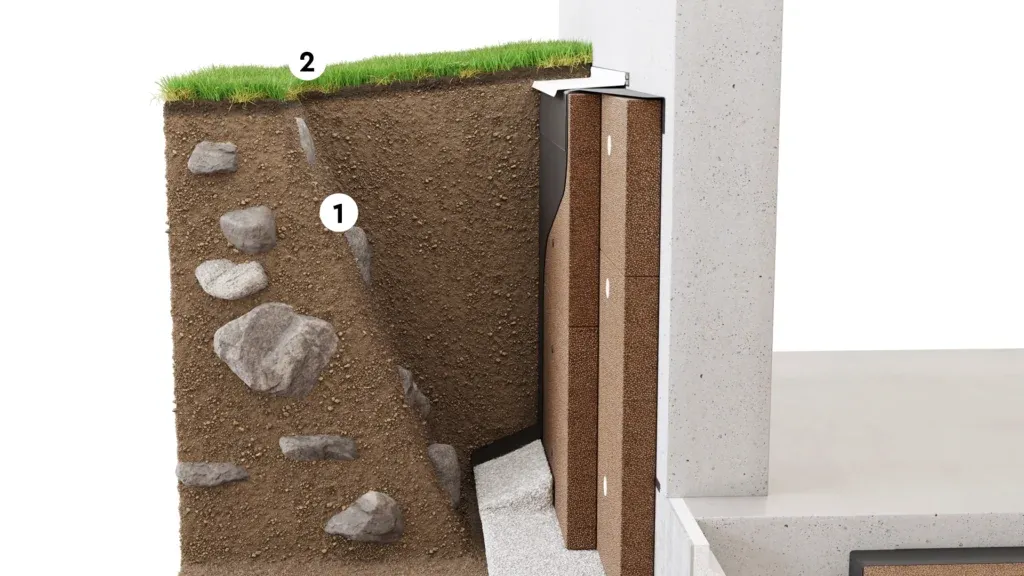
NOTE: Before you begin, please read the prerequisites and all the steps in the instructions carefully.
- Backfilling shall be done using existing soil, but not stones larger than 100 mm in diameter or frozen soil. If larger stones are to be used, they must be placed on the trench slope (see image) so that they do not come into contact with the Pordrän panels. The top layer, approx. 300 mm, must always be backfilled with dense material. Never use draining materials such as gravel or macadam. If the finished ground surface is to be paved, compactable material must be used. NOTE! If compaction with a soil compactor weighing over 100 kg is to be used, at least Pordrän must be used as base insulation.
- The finished ground surface should, if possible, slope 2–3 cm per meter for at least 2 meters away from the building. NOTE: Check the slope of the ground at regular intervals and, if necessary, add new fill material so that the ground continues to slope away from the building.
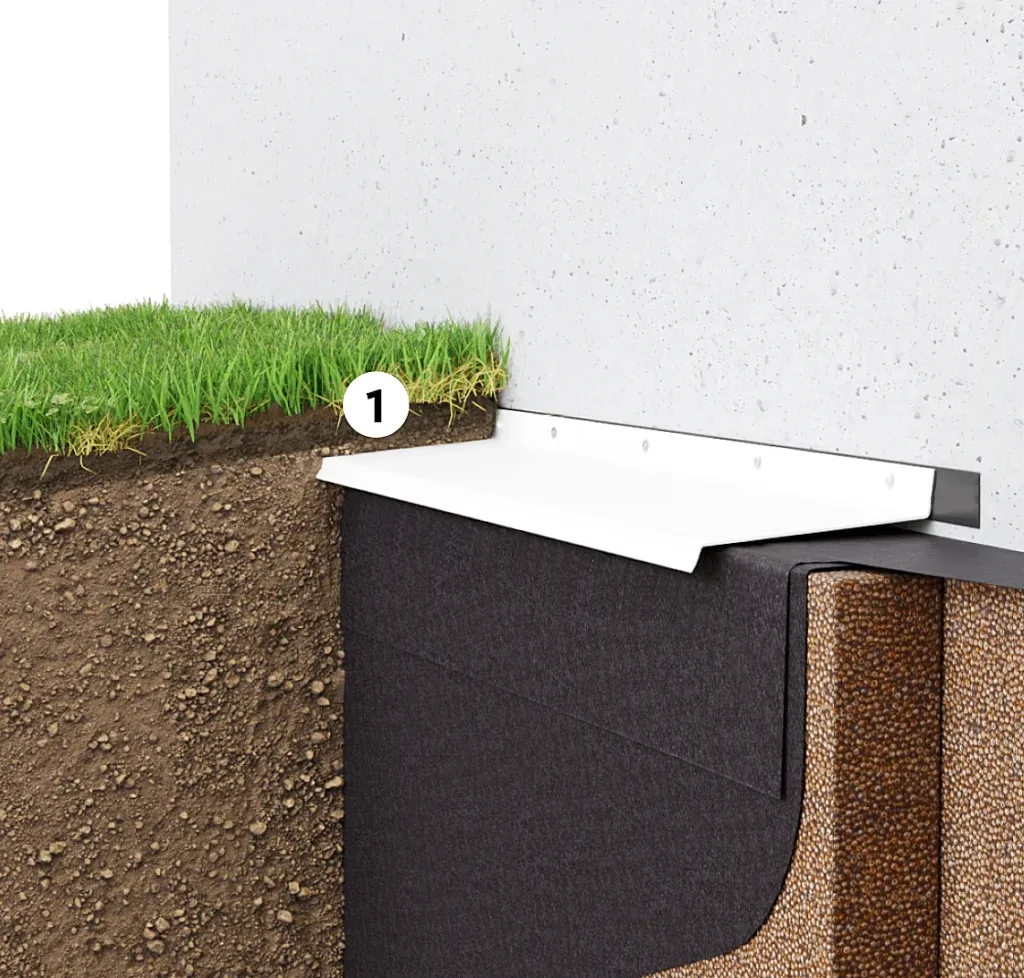
Grass surface
- No special precautions are necessary beyond the standard installation of a cover strip.
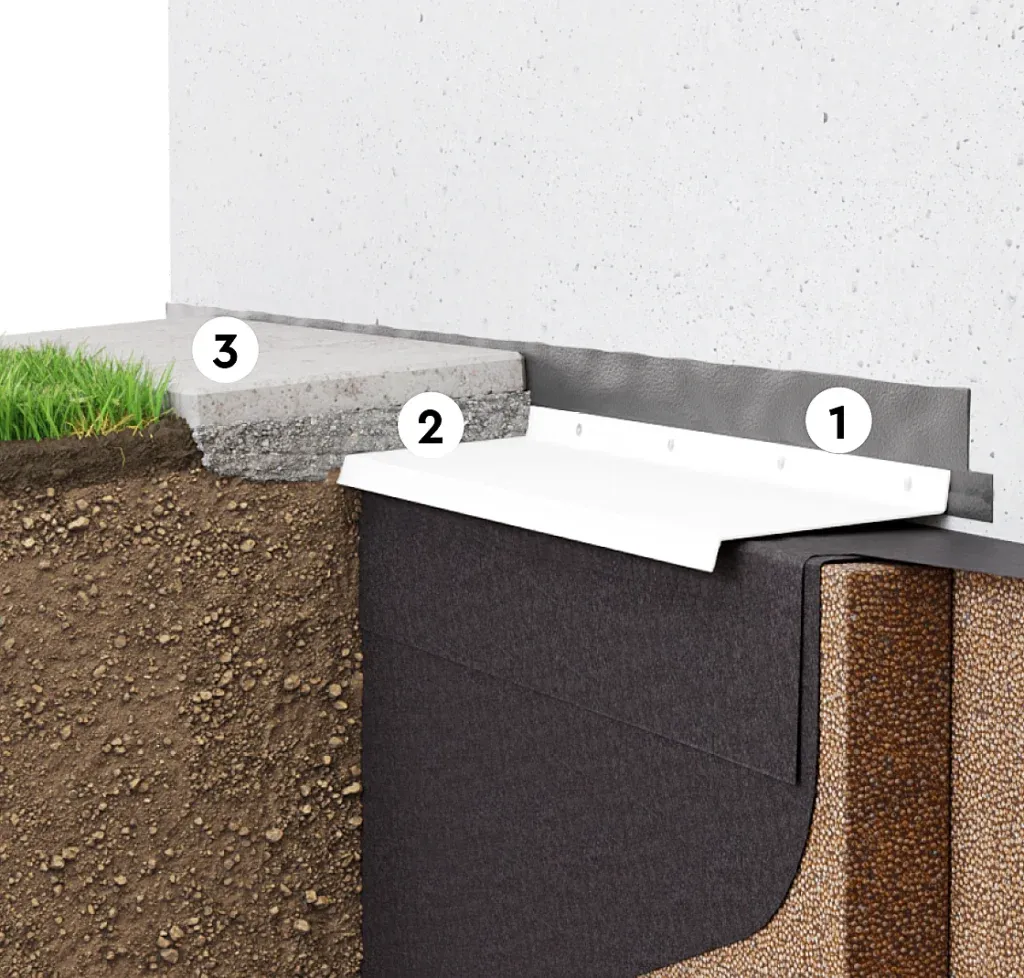
Surface layer: paving stones/slabs
- The waterproofing membrane against the adjacent foundation wall should extend a few centimeters above the top edge of the paving stones or slabs.
- A layer of adhesive is applied on top of the trim.
- Paving stones/pavers.
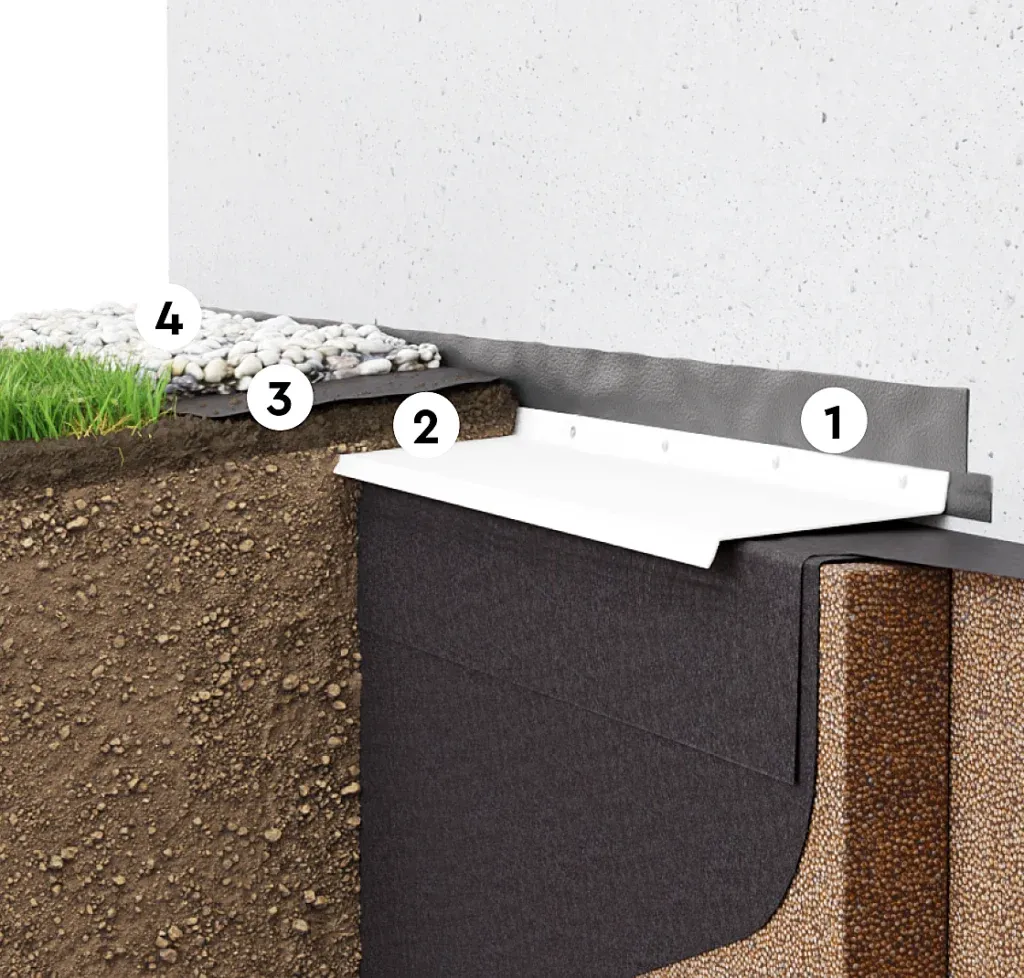
Decorative stone cladding
- The waterproofing membrane against the adjoining foundation wall should extend a few centimeters above the top edge of the decorative stone.
- A base layer or soil is applied on top of the cover strip.
- A geotextile should separate the decorative stone from the underlying layer.
- Decorative stone.
Step 5
Above-ground foundation insulation
If the above-ground foundation insulation is the same thickness as the below-ground insulation, installation is performed without Pordrän . If the below-ground insulation is thicker than the above-ground foundation insulation, installation is performed with Pordrän .
With Pordrän
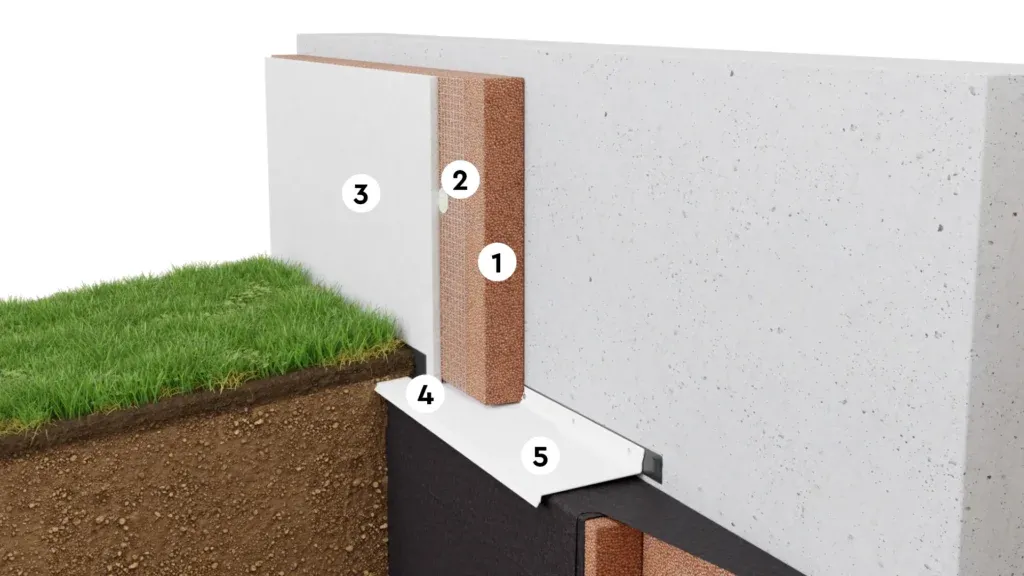
- Toilet seat
- Pordrän . At least 2 per sheet
- Plaster or fiber cement board, following the manufacturer’s instructions
- Pordrän
- Pordrän
Without Pordrän
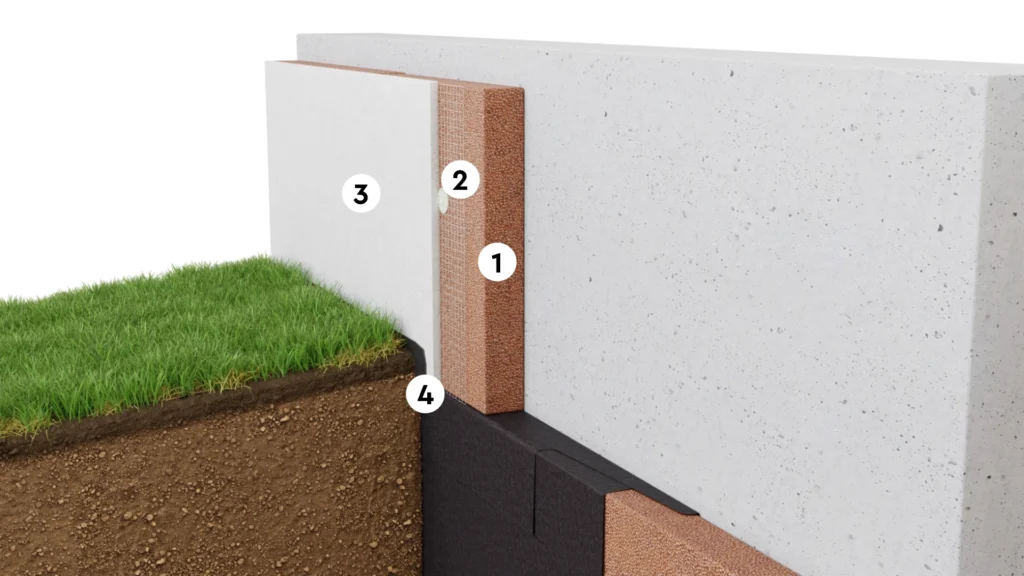
- Toilet seat
- Pordrän . At least 2 per sheet
- Plaster or fiber cement board, following the manufacturer’s instructions
- Pordrän
Choose flooring
Floor/Paving on the ground
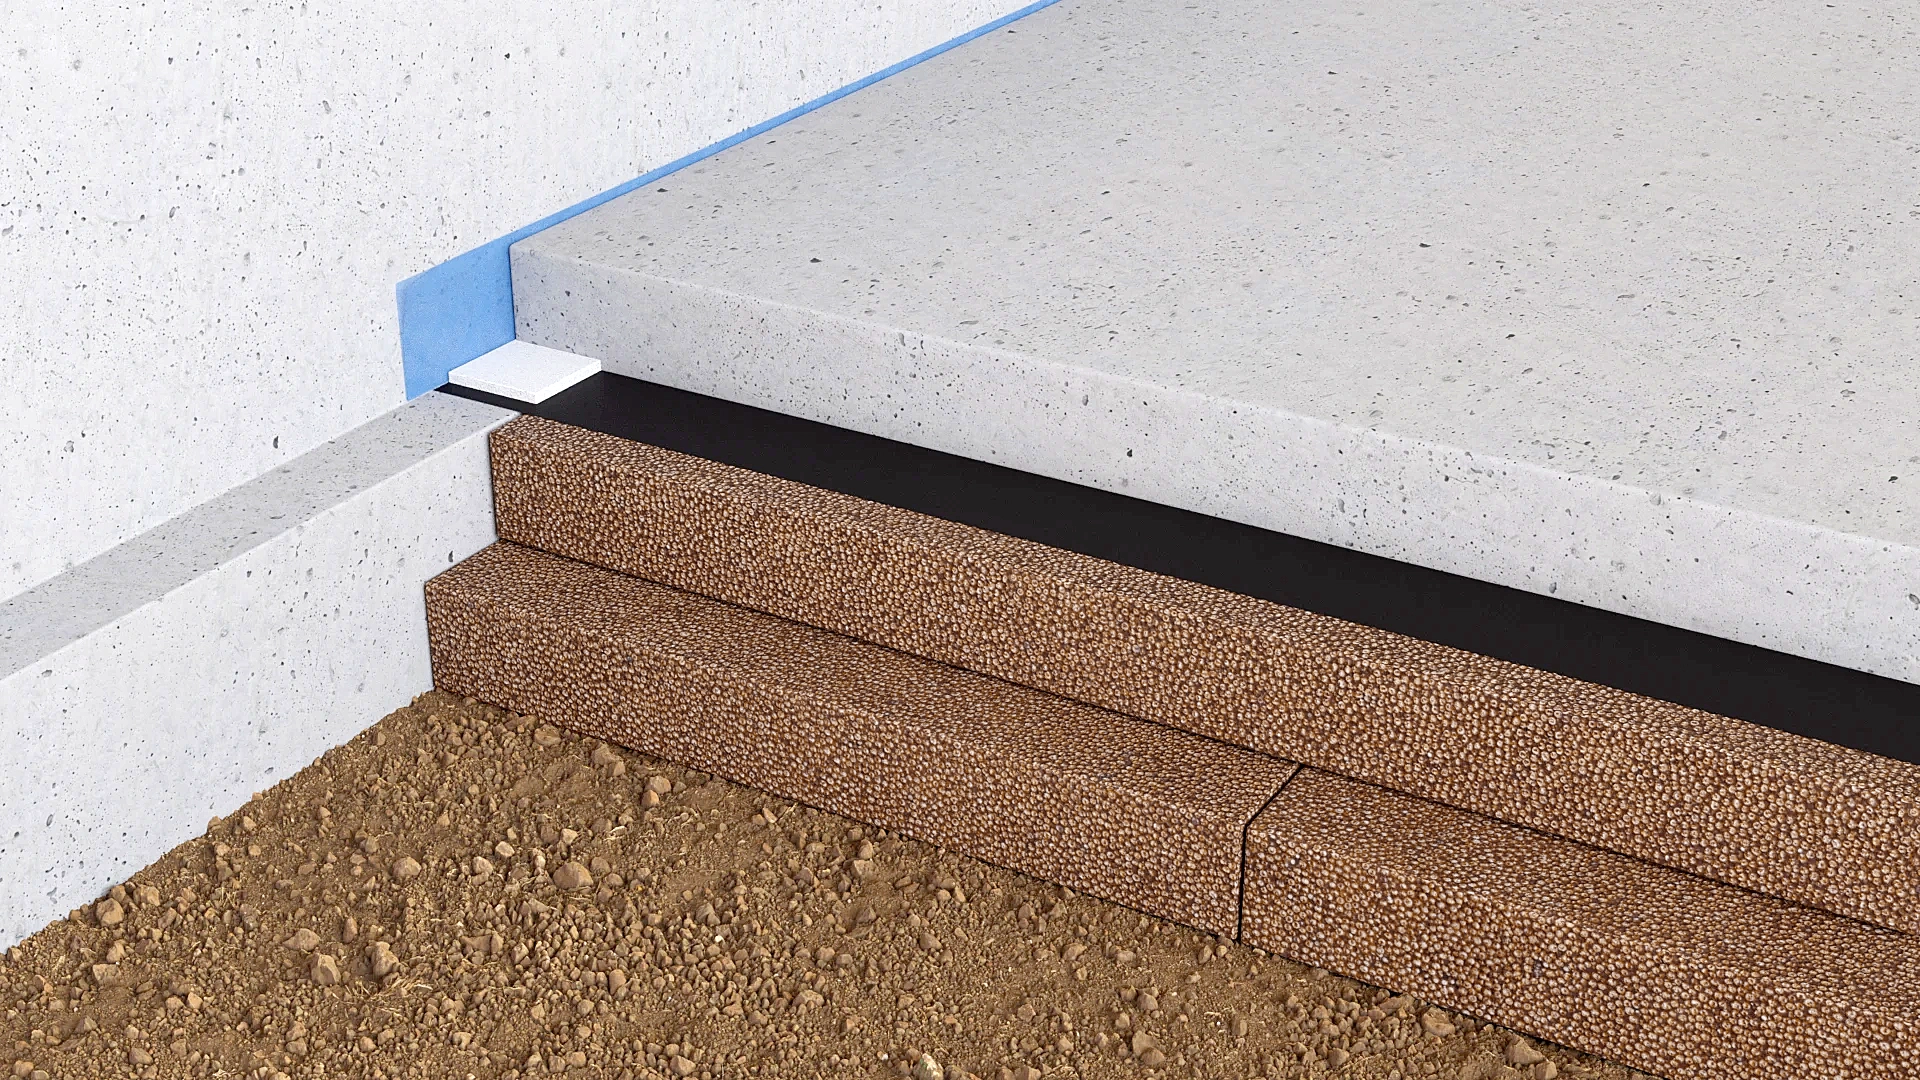
Pordrän serves the same purpose beneath a concrete structure in contact with the ground as it does alongside a concrete structure, such as a basement wall.
- Double-sided drying.
- Less excavation work—always saves at least 150 mm of excavation per square meter of building area—and, not least, the environment.
- Less soil handling, always saving on removal and the purchase of new soil, at least 150 mm x the building’s footprint, and, not least, the environment.
- Shorter construction time thanks to constant moisture drainage toward the ground through the moisture-wicking Pordrän .
- When renovating basements, you always gain an additional 150 mm of headroom compared to traditional EPS or XPS insulation, since a 150 mm layer of gravel for drainage is unnecessary.
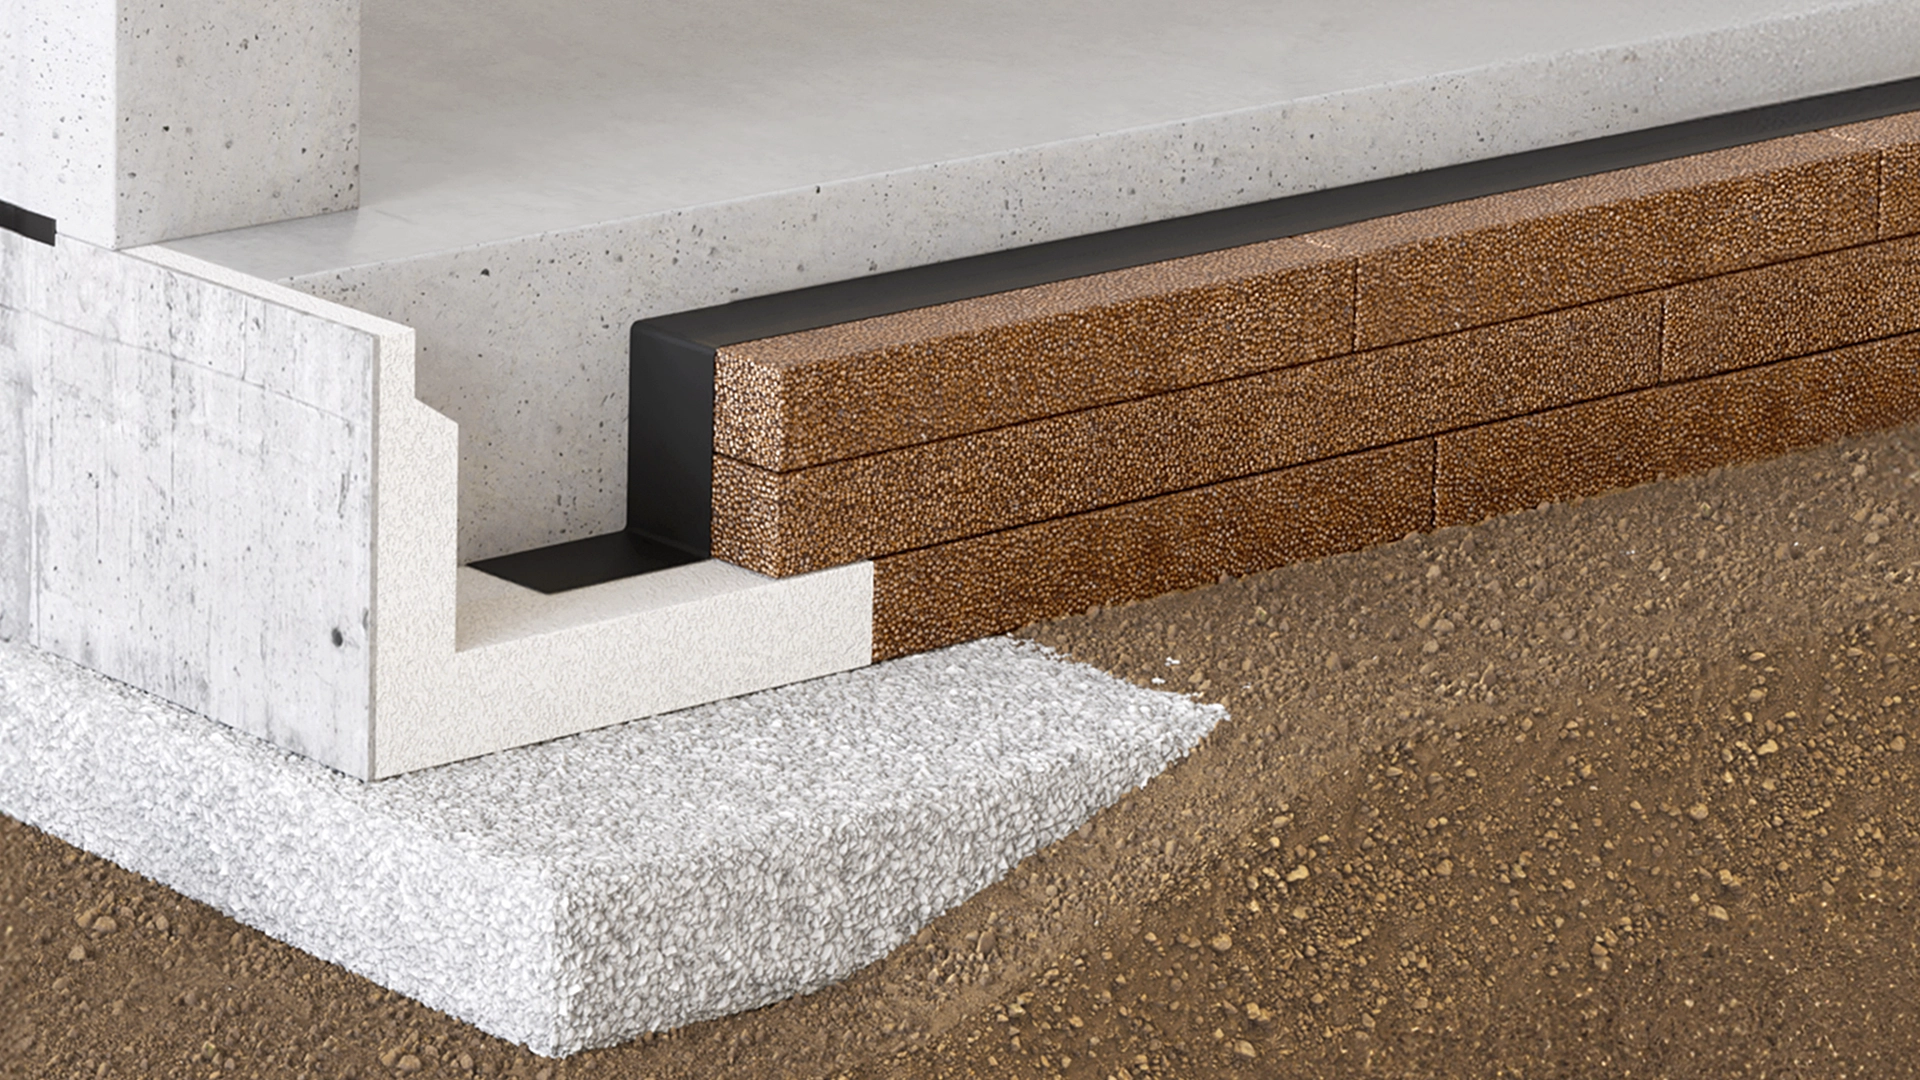
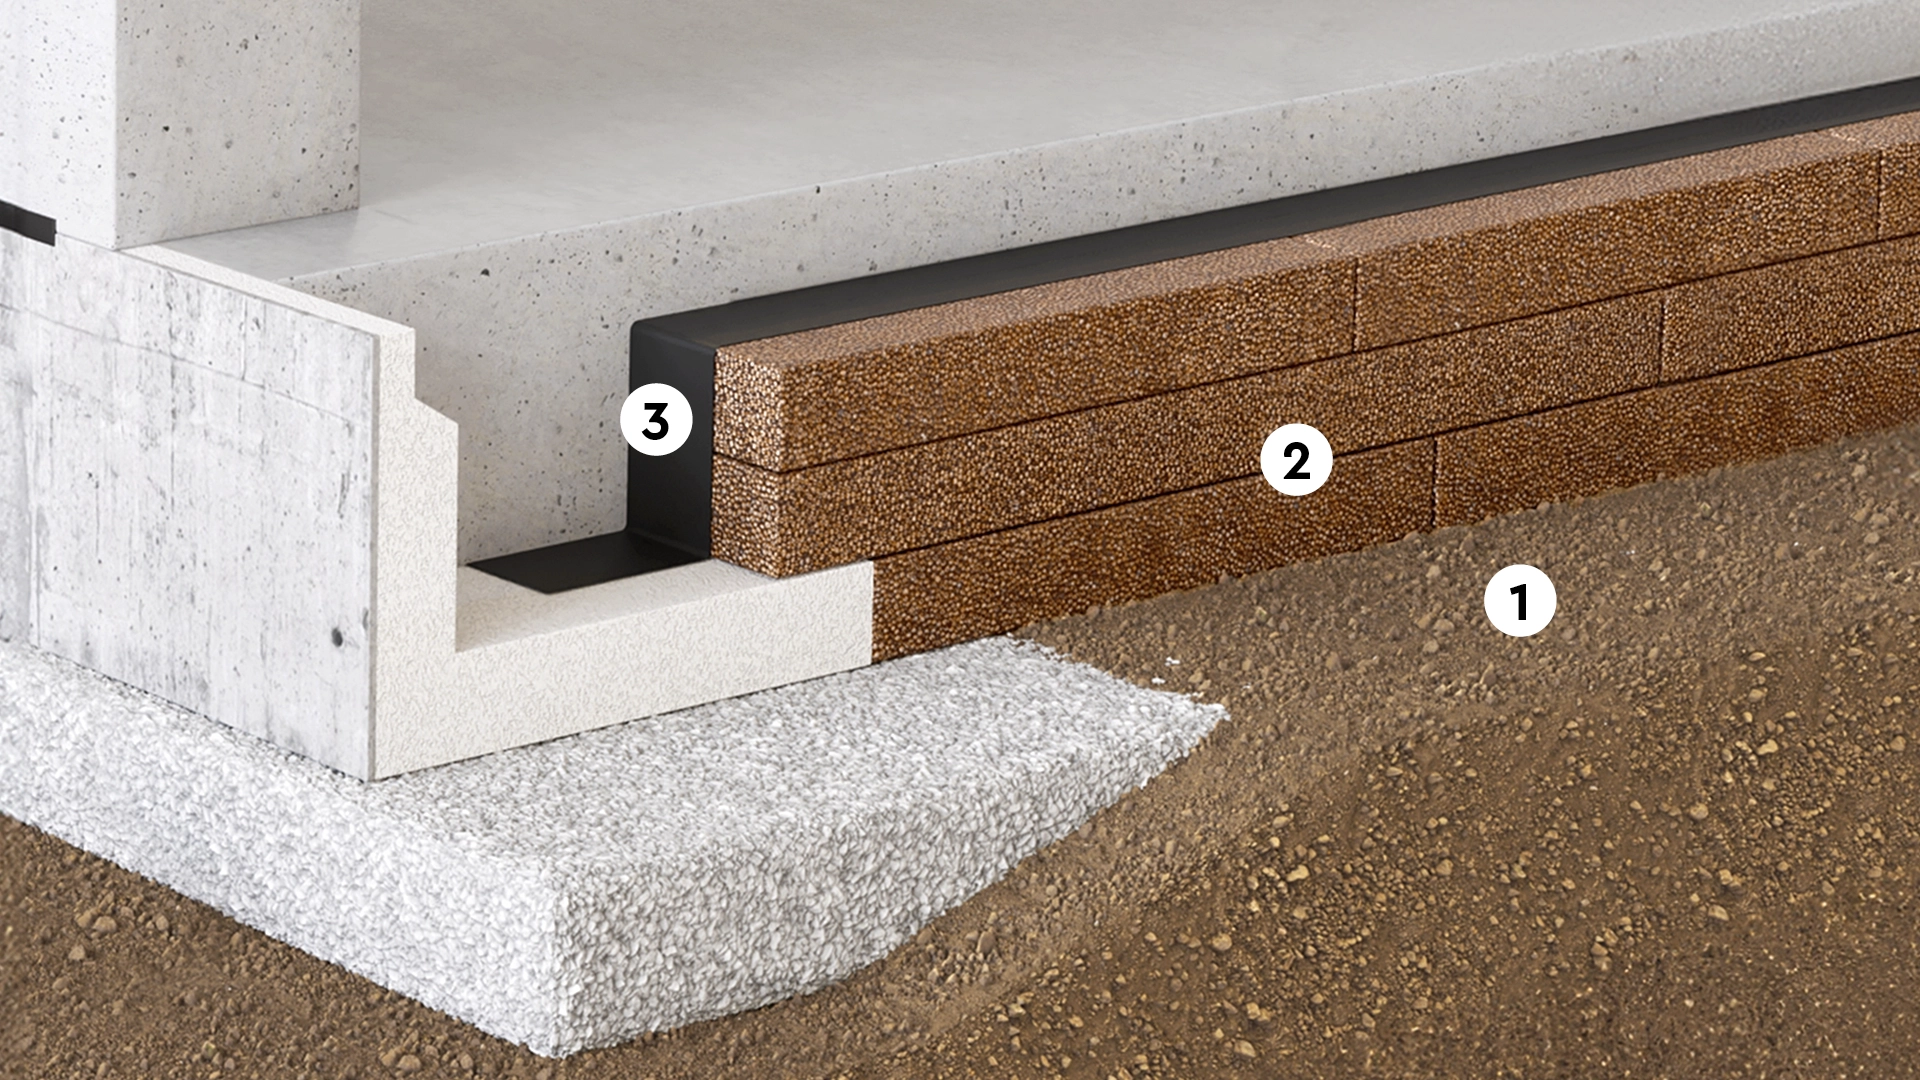
New construction
Ignore the gravel layer beneath the Pordrän panels. However, there must be gravel beneath the edge beam so that the Pordrän panels make contact with the drainage layer or drainage pipe. Otherwise, the same procedure applies as for traditional foundation work using cellular plastic and gravel.
- Level the ground using the existing material.
- Install Pordrän panels with a minimum hardness rating of P25.
- Lay Pordrän over the Pordrän panels. Allow for an overlap of approximately 250 mm.
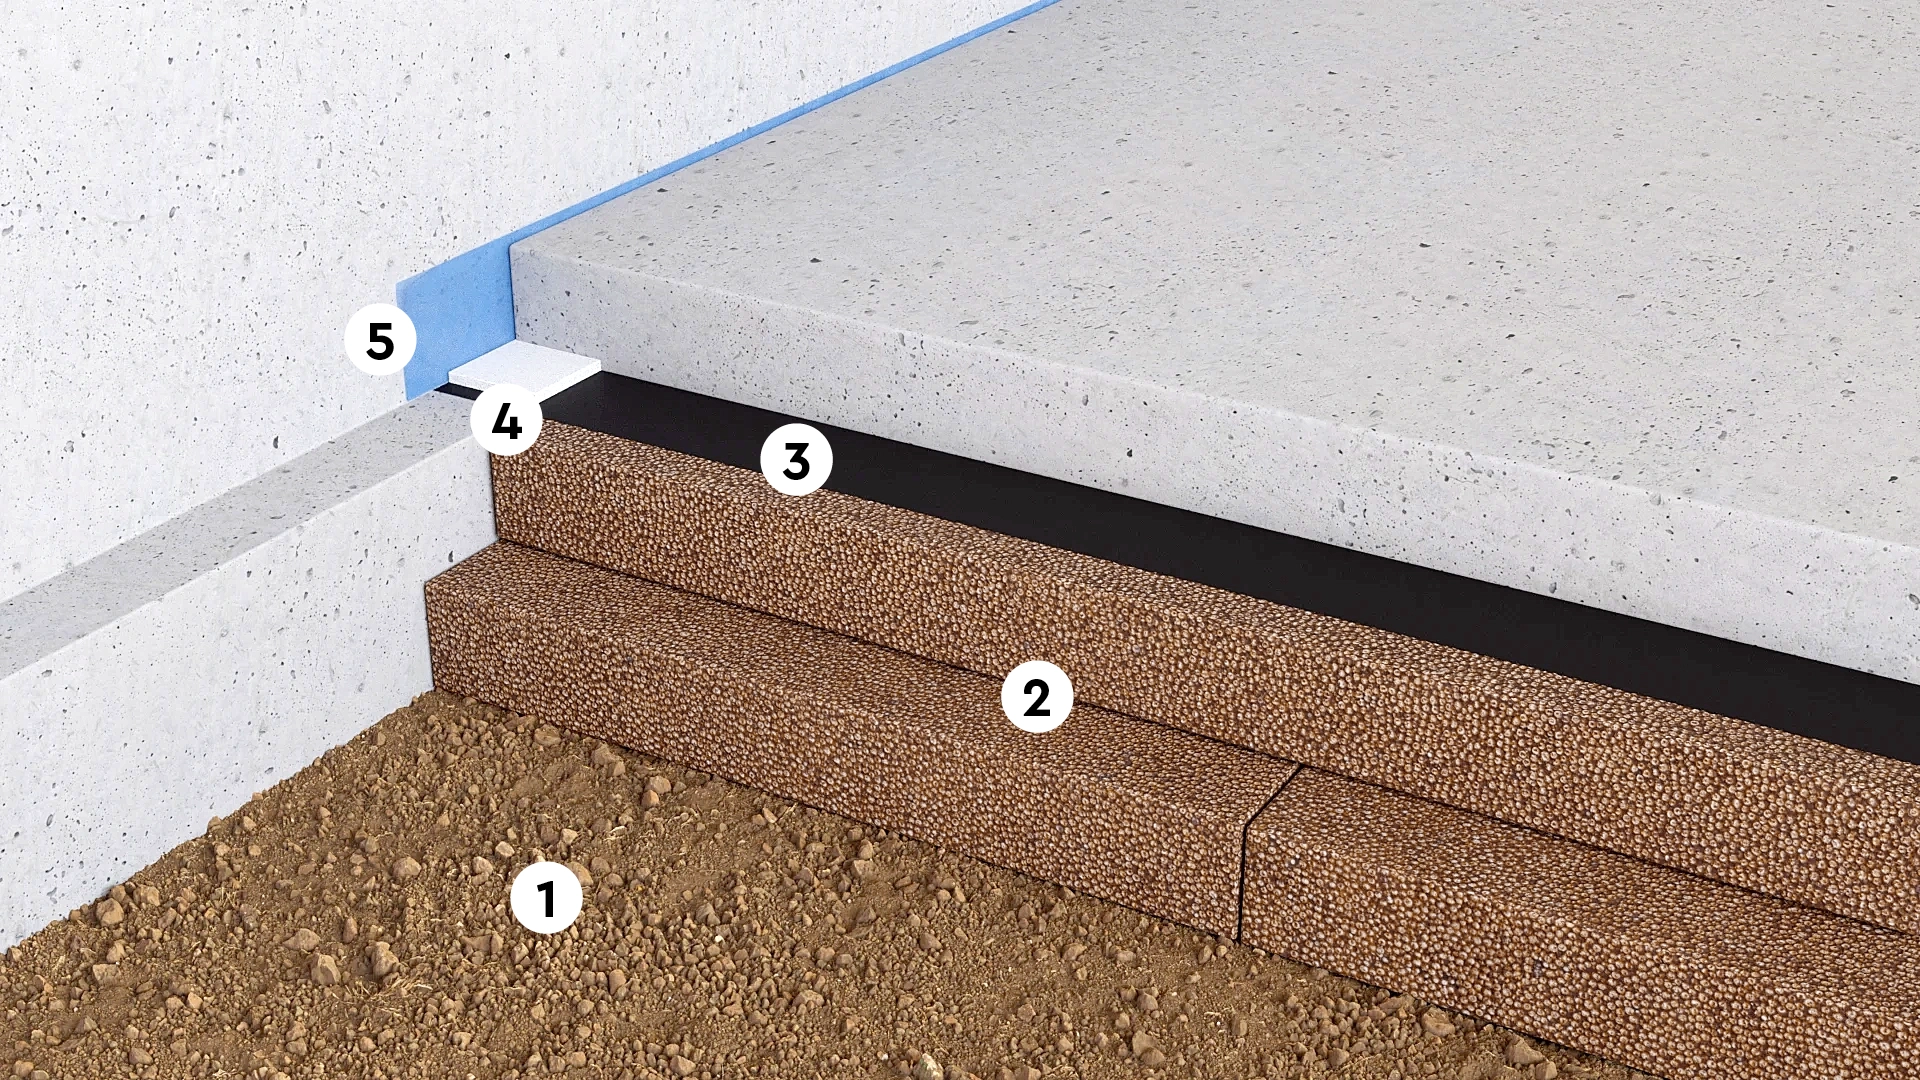
Renovation
- Once you have removed the existing concrete floor, level the ground using the existing material.
- Install Pordrän panels with a minimum hardness rating of P25, 100 mm thick without underfloor heating or 200 mm thick with underfloor heating.
- Lay Pordrän over the Pordrän panels, overlapping them by approximately 250 mm.
- Place a layer of foam, approximately 10–30 mm thick, on the heel.
- Place a double-layered Pordrän between the basement wall and the new floor.

